Greenhouse construction tutorial. How to JDPShack. Directions part 1.
John Pandrea
ALWAYS WEAR SAFETY GLASSES, EAR PROTECTION, WORK GLOVES WHEN HANDLING METEL AND A DUST MASK WHEN DIGGING HOLES, MIXING CEMENT and CUTTING or DRILLING.
How to JDPShack
Steps 1-50
Construction directions
Read everything completely before you get started.
General carpentry knowledge may be needed.
Check your local building codes, including “setback”; a space between your property line and any structure, other than a fence.
Building a JDPShack will require room to walk around the outside perimeter, in order to construct it. If you are building near the property line or other obstacles, make sure you have adequate room.
Height restrictions for this type of structure may or may not apply in your area, (greenhouse… shed… chicken coup). If height restrictions do apply, you can shorten your JDPShack down to about 7 ft. tall minimum. See the “options” section for more information. Standard height is about 9 feet tall.
As a general rough frame carpentry rule, err on the short side of measurements.
EXAMPLE; 19ft.117/8in. is OK for 20ft. However, 20ft. 1/8 in. is not good. Try to mark all readings and make all cuts exact or a little short. 1/16in. short is recommended. And, always double check and triple check all of your measurements as you go in order to prevent mistakes.
The JDPShack building site should not slope more than 5% side to side and 5% end to end. A level building site is optimal. When complete, JDPShack is level from side to side, whether or not the building site slopes. JDPShack can be built level from end to end, or can be built to slope from end to end, in order to more readily accept gutter installation. Gutter installation will be covered in the options section.
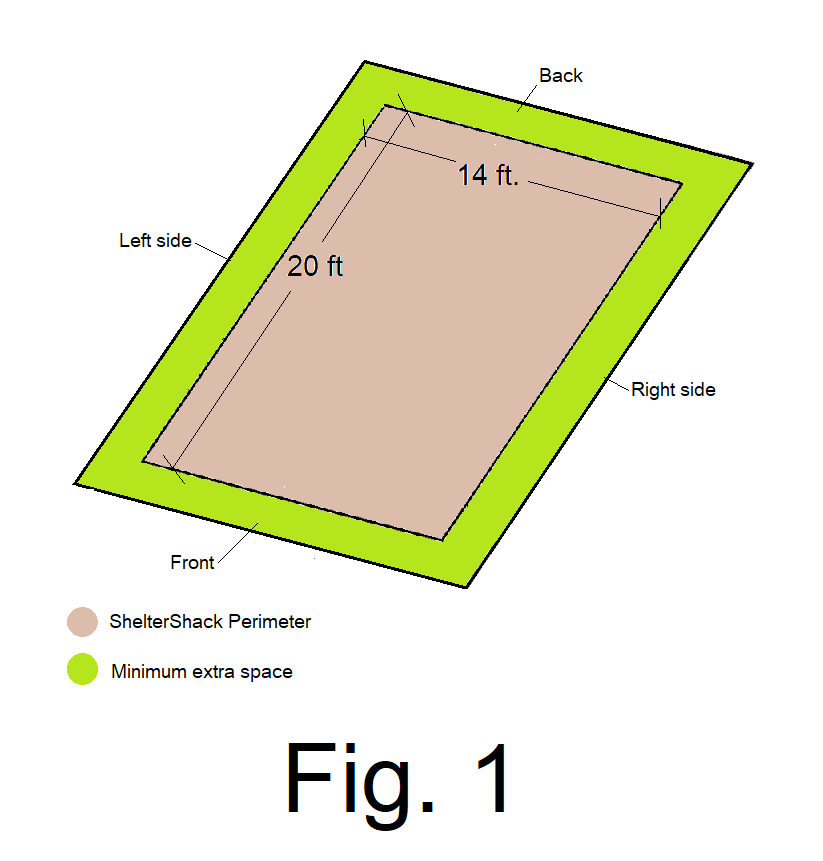
1) Prepare your constructions site, enough room for your building plus some extra room, (3 feet minimum is recommended), around the perimeter. Fig. 1
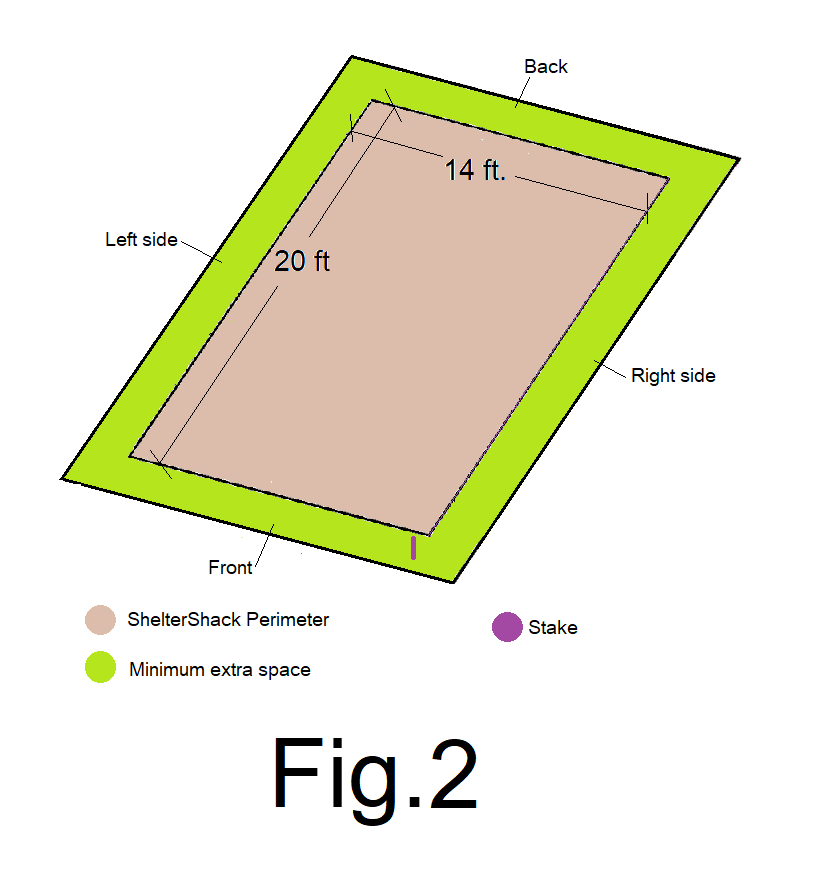
2) Set, (pound into the ground), a (24” to 30” depending on your type of ground), (metal or wooden) stake securely and plum at a location in line with the future right side wall location, and about 2 ft. out in front of the front corner of the right sidewall. Fig 2
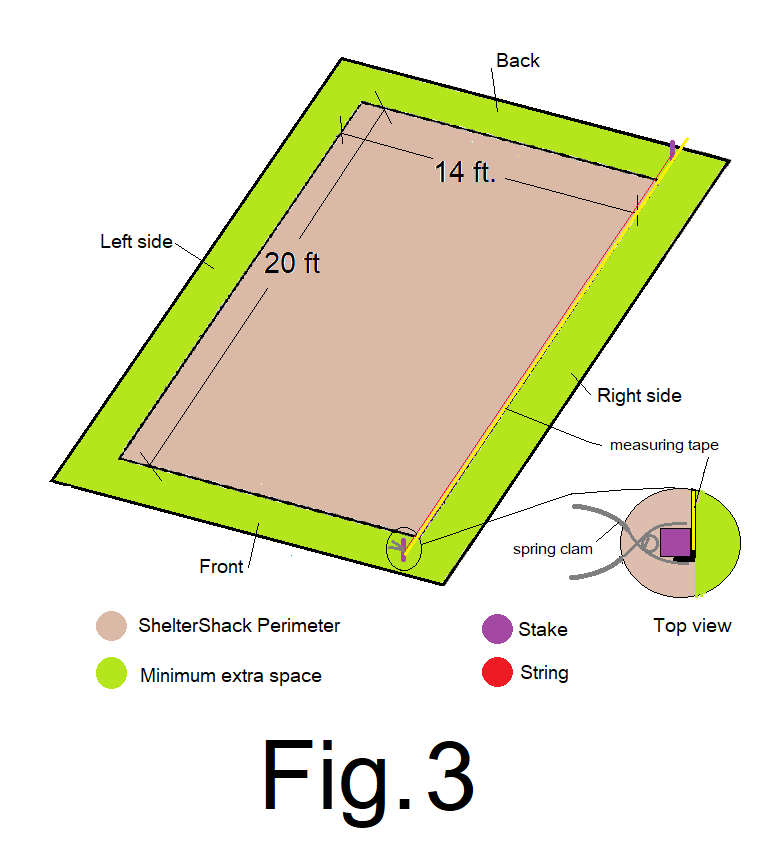
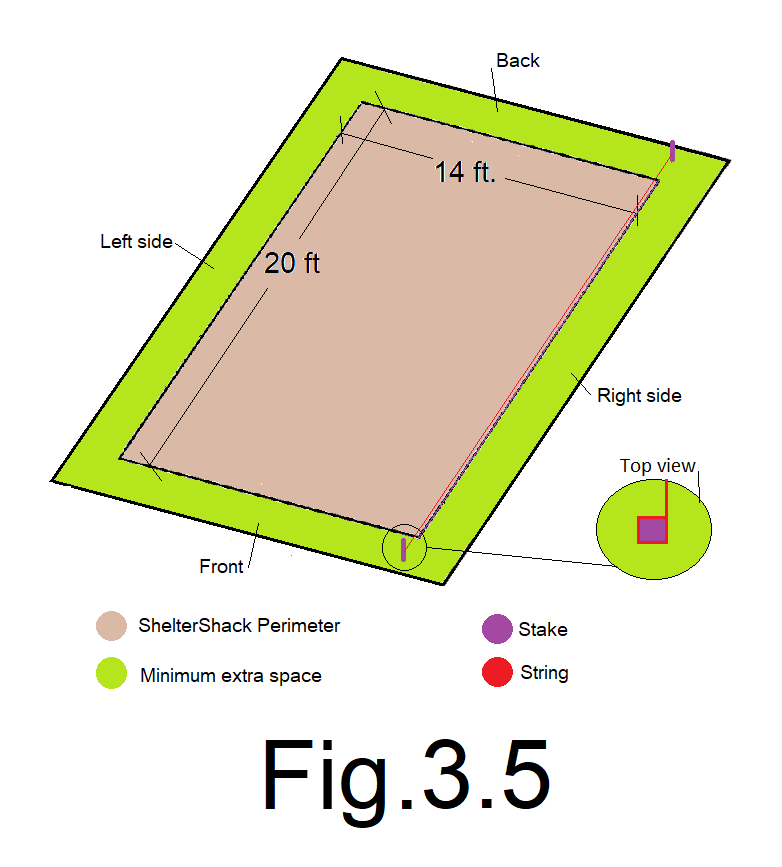
3) Small spring clamp the leading edge of a measuring tape to the stake, measure from the stake, in line with the right sidewall, straight back 24 ft., or, 2 ft. out beyond the back of the back corner of the right side wall. Set another stake securely and plum into the ground at that location. Your 2 stakes should be 24 ft. apart. Remove the measuring tape and the spring clamp, and attach one end of a mason string to one stake about 6 in. up from the ground, attach the other end of the string to the other stake about 6 in. up from the ground. Light to moderate tension and secure the string between the 2 stakes. You will use this string as your reference in establishing the 2 corners and the right side wall of your JDPShack. Fig 3 and Fig 3.5
4) Mark the string with a sharpie ink pen at the approximate location of the front right corner. The center of the ink mark on the string is the location. Carefully set another stake securely and plum into the ground just inside the string. Maintain a 1/4 in. gap between the stake and the string. And set stake just inside of the center of the ink mark on the string. Fig 4
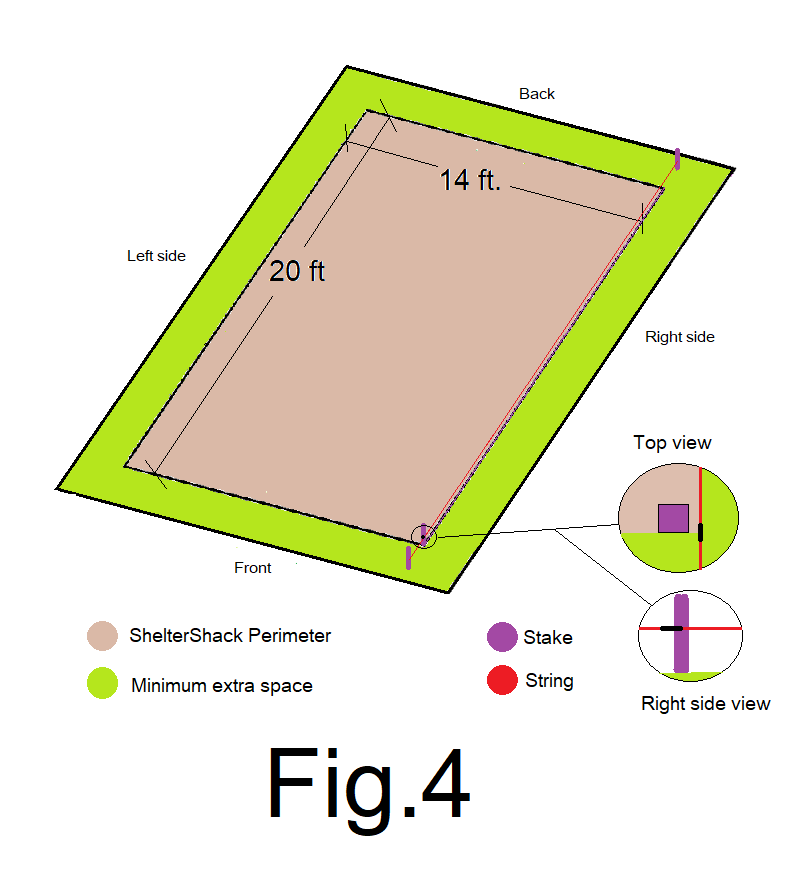
Now, you have established where one corner of your JDPShack will be located.
5) Spring clamp the end of your measuring tape to the outside edge of the first corner stake. Carefully pull the tape along the string to 20 ft. and mark the string. Set another stake securely and plum into the ground, with its outside edge lined up to the 20 ft. mark on the string and 1/4 in. inside the string. Fig 5
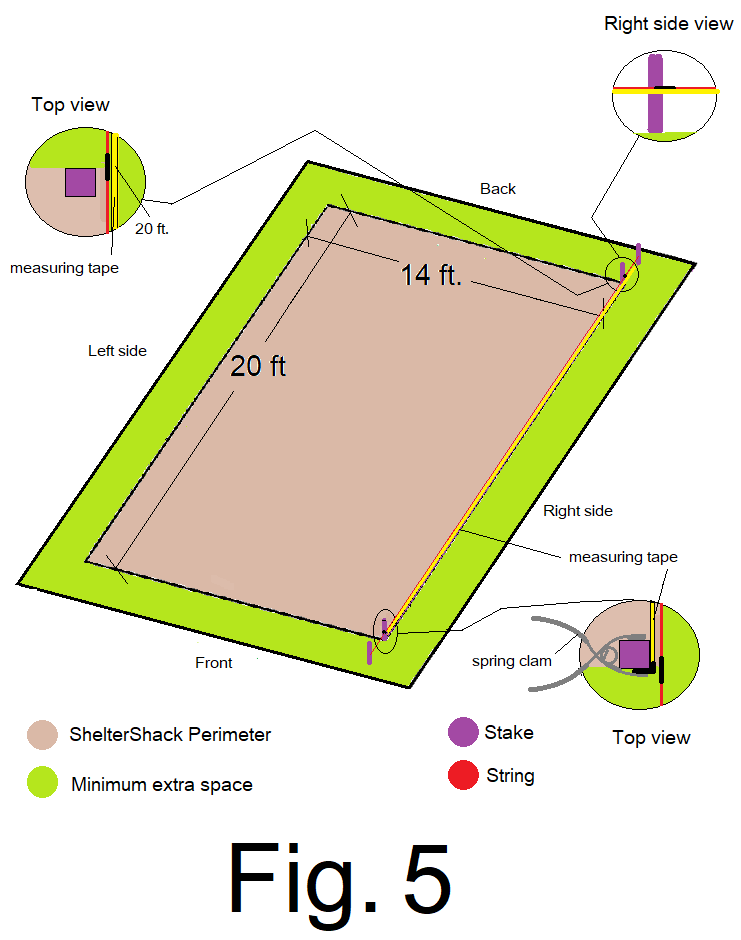
If you measure from the front edge of the first stake, along the string to the back edge of the second stake, it should equal 20 ft., the overall length of your JDPShack.
Now you have determined the first two corners and the first side wall location. The 2 temporary outside stakes, along with the string can now be removed.
Now you will determine the location of the left side wall and corners. You will need 2 measuring tapes and 2 spring clamps.
I use the math formula √(a2+b2)= c and a calculator with square and square root function for determining the diagonal distance from corner to corner. The square root of “a”(length)2+“b”(width)2= “c”(diagonal distance).
This is about building a JDPShack 20ft long “a” and 14 ft wide “b”. If your JDPShack length is different, (other than 20ft), replace the “20” with your number in the math formula. The answer is the diagonal distance from corner to corner and is needed to determine the location of the other sidewall. See the “Options” page for more details.
24ft 5in, or 24’ 5” is the diagonal corner to corner distance, both ways, in order to “square” a 20 ft. long by 14 ft. wide structure.
14 ft. wide is the only width available in this tutorial. JDPShack can be configured in a different width. Additional calculations will be required. We will cover how to build a JDPShack in different widths in the options section.
6) With one measuring tape, and a spring clamp, measure 24ft. 5 in. from the outside corner of the front right corner stake, diagonally, and at the same time, with the other measuring tape and a spring clamp, measure 14ft. from the outside corner of the back right corner stake across the back end wall. The location that these two tapes intersect, at the readings mentioned, is the location of the outside corner of the third stake. Carefully set the third stake plum and secure at that spot. Fig 6
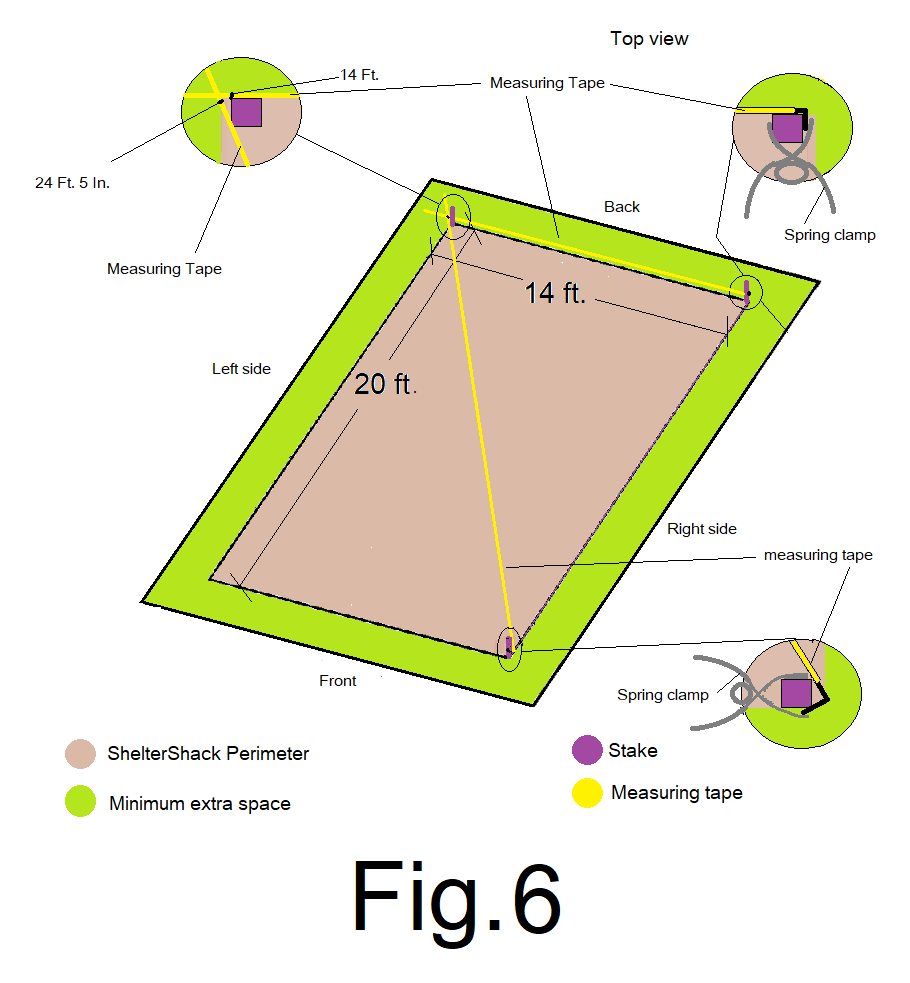
You have determined the location of the third corner. Now, for the final corner.
7) With one of your measuring tapes, and a spring clamp, measure 20 ft. from the back left corner of the back left corner stake, along the left side wall. And at the same time, with the other measuring tape and a spring clamp, measure 14 ft. from the front right corner of the front right corner stake, along the front end wall. The location where these two tapes intersect, at the readings mentioned, is the location of the front left corner of the front left corner stake. Set the fourth stake plum and secure with the outside corner of the stake at that location. Fig 7
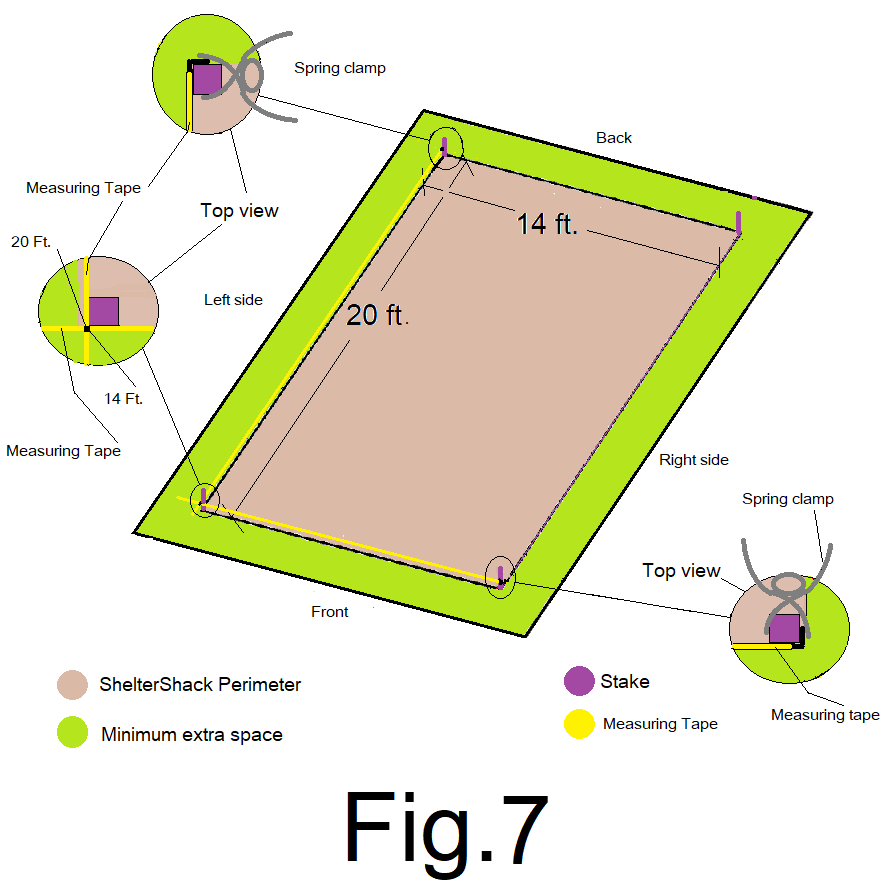
Now all four corners have been established.
8) Check all of your corner to corner measurements. End wall outside corner to outside corner should be 14 ft. at both ends and sidewall corner to corner should be 20 ft. at both sides. Both diagonal measurements are 24ft. 5in. These are all outside corner of the stake to outside corner of the stake measurements. Fig. 8
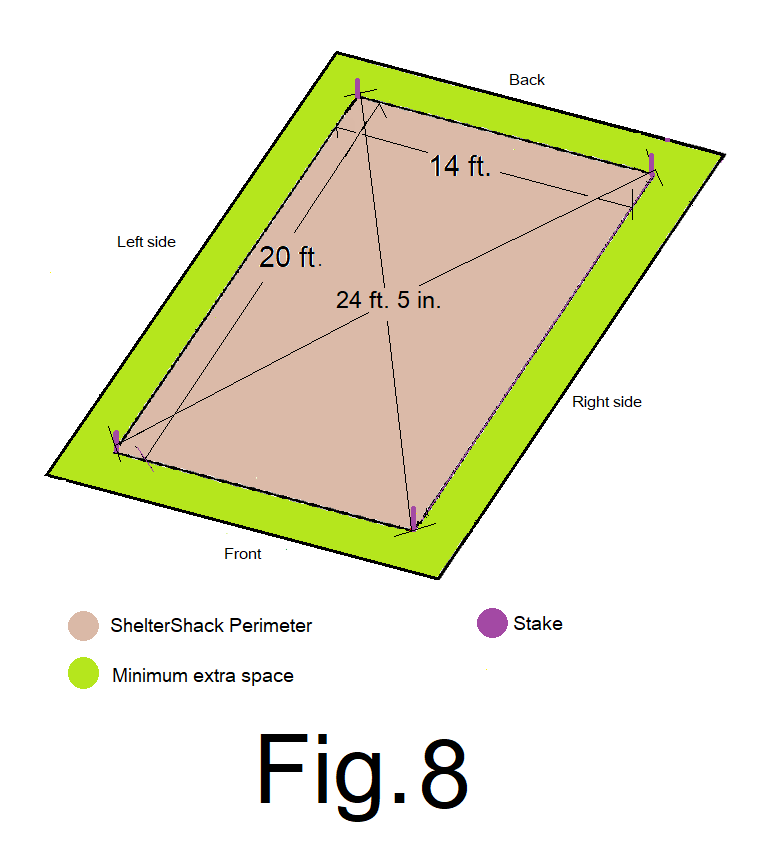
The closer to exact the better. If your readings are off by more than ½ in., then something went wrong and you need to redo it.
OK good job, now
9) Attach one end of a mason string to the right front corner stake, about four inches up from the ground and the other end of the string to the right back corner stake about four inches up from the ground, with the string oriented to the outside of the stakes. Using a can of ground marking spray paint, (this is special paint which sprays upside down or “inverted” and is formulated to mark the ground), spray a line directly under the string between the right front corner and the back right corner, and on through each about 2 ft. minimum. Then repeat on the left side. Fig 9
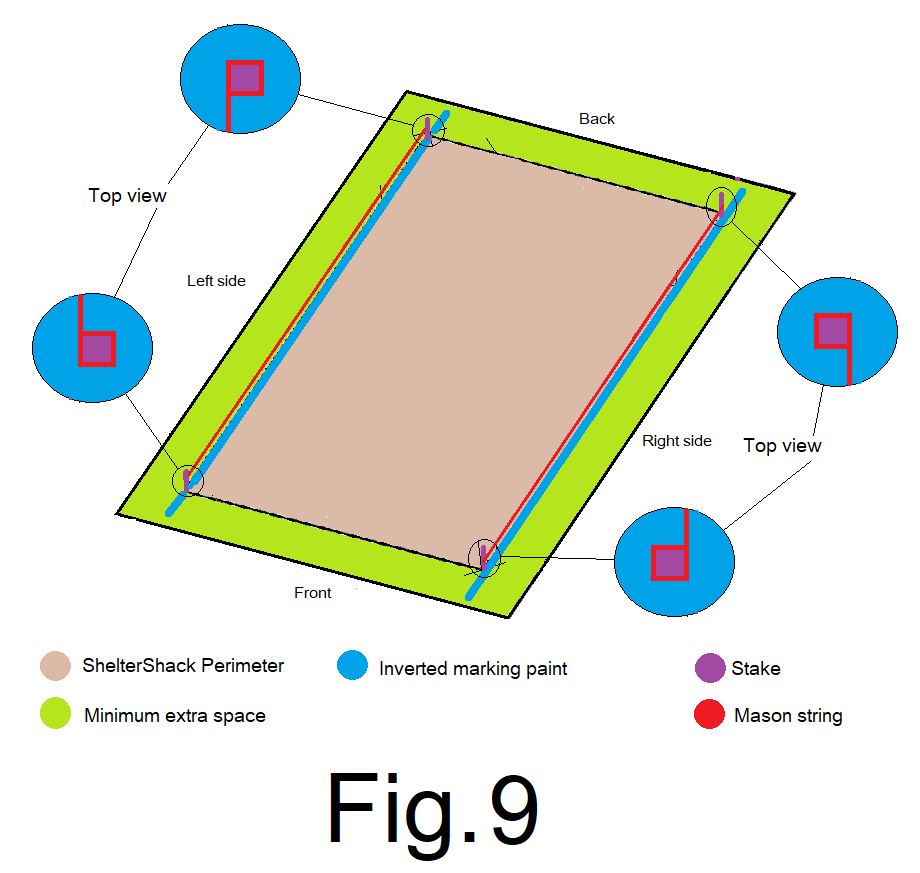
10) Remove the mason strings, leaving the four stakes in place.
11) Attach one end of a measuring tape to the outside corner of stake #1 with a spring clamp and pull it along the ground, along the sidewall towards stake #2. Using the “Inverted marking paint” mark an approx. 3 ft. long cross line on the ground at every 4 ft. along the painted sidewall line. Fig. 10
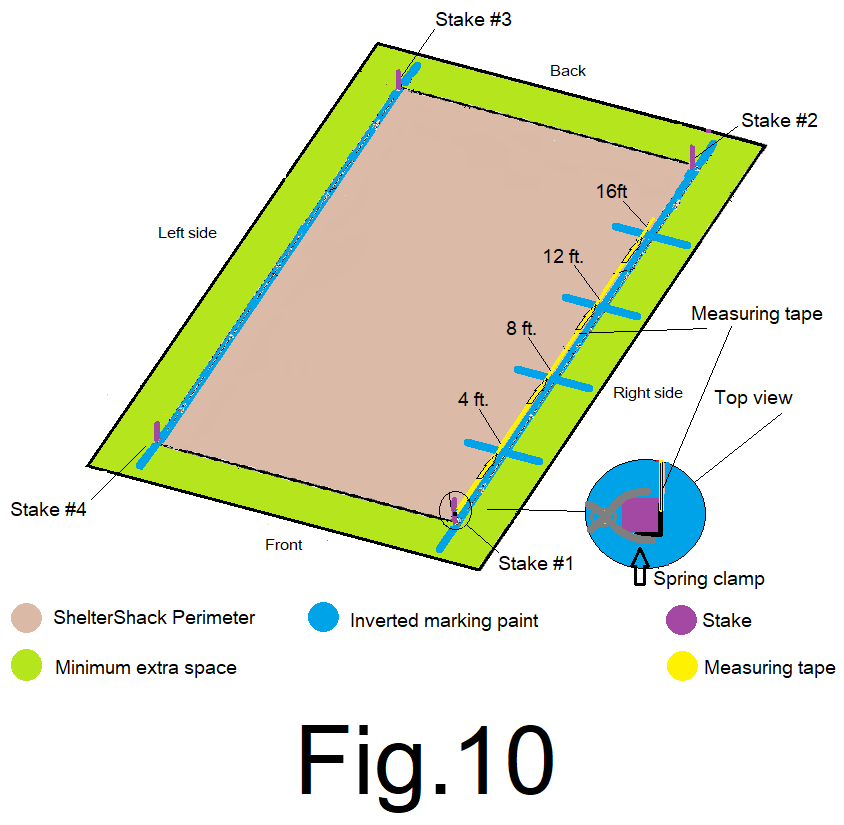
12) Measure from the front right corner of the front right corner stake #1, along the sidewall and mark a 3 ft. long cross line at 4 inches. Fig 11
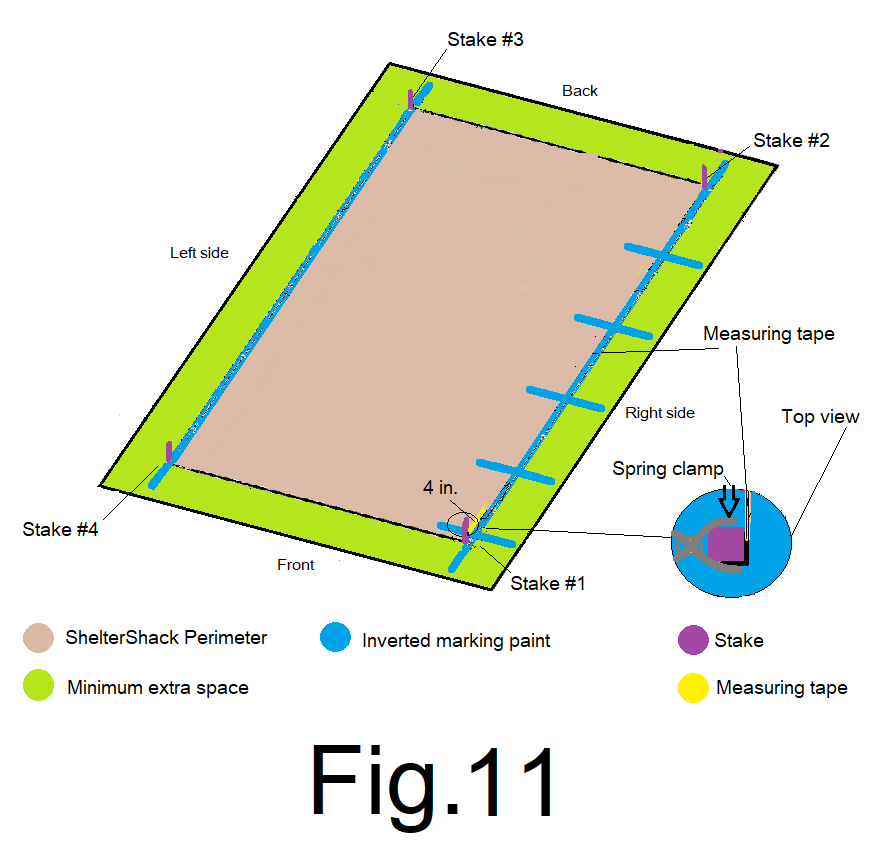
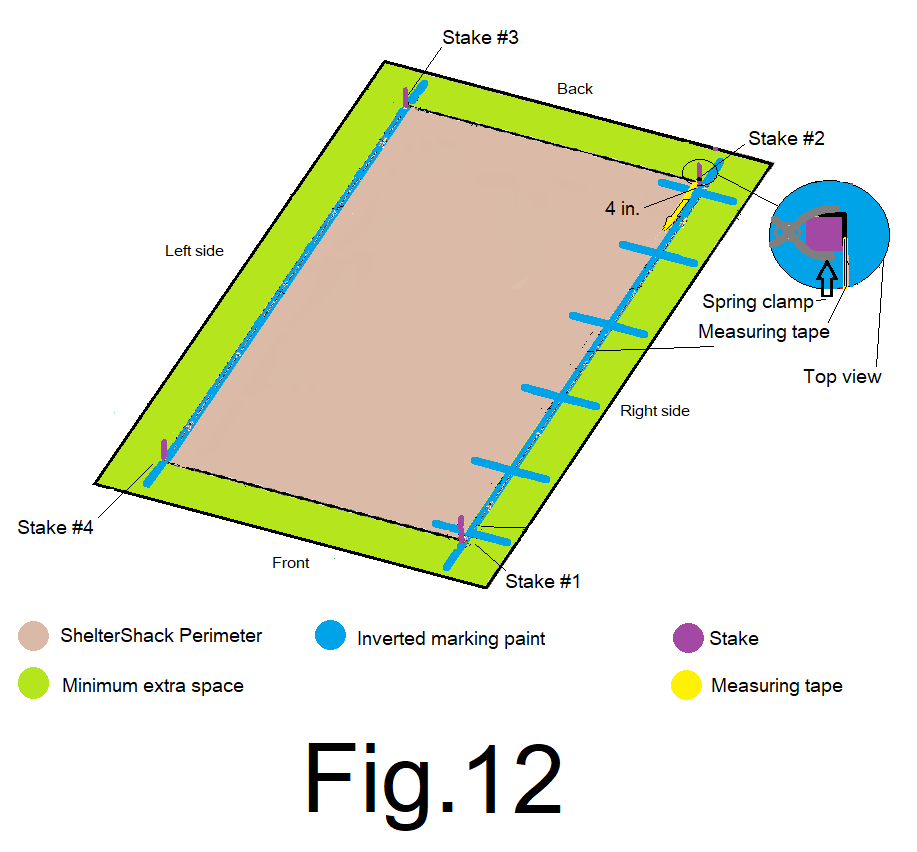
13) Measure from the back right corner of the back right corner stake #2 along the sidewall toward the front and mark a 3 ft. long cross line at 4 inches. Fig 12
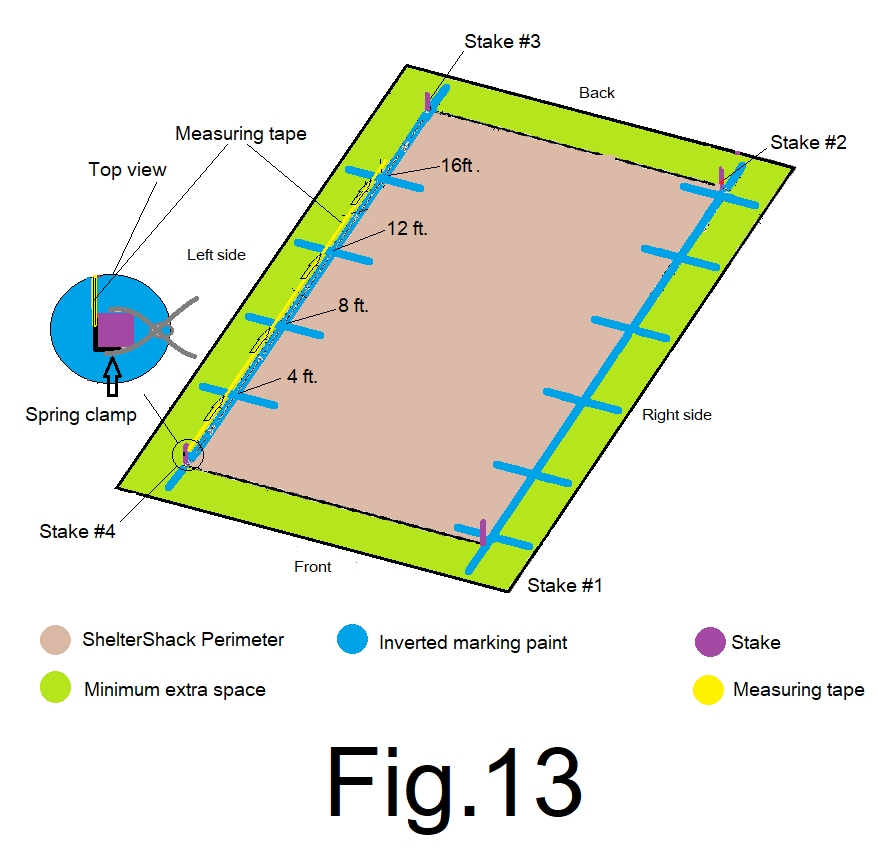
14) ) Attach one end of a measuring tape to the outside corner of stake #4 with a spring clamp and pull it along the ground, along the left sidewall towards stake #3. Using the “Inverted marking paint” mark a 3 ft. cross line on the ground at every 4 ft. along the painted left sidewall line. Fig. 13
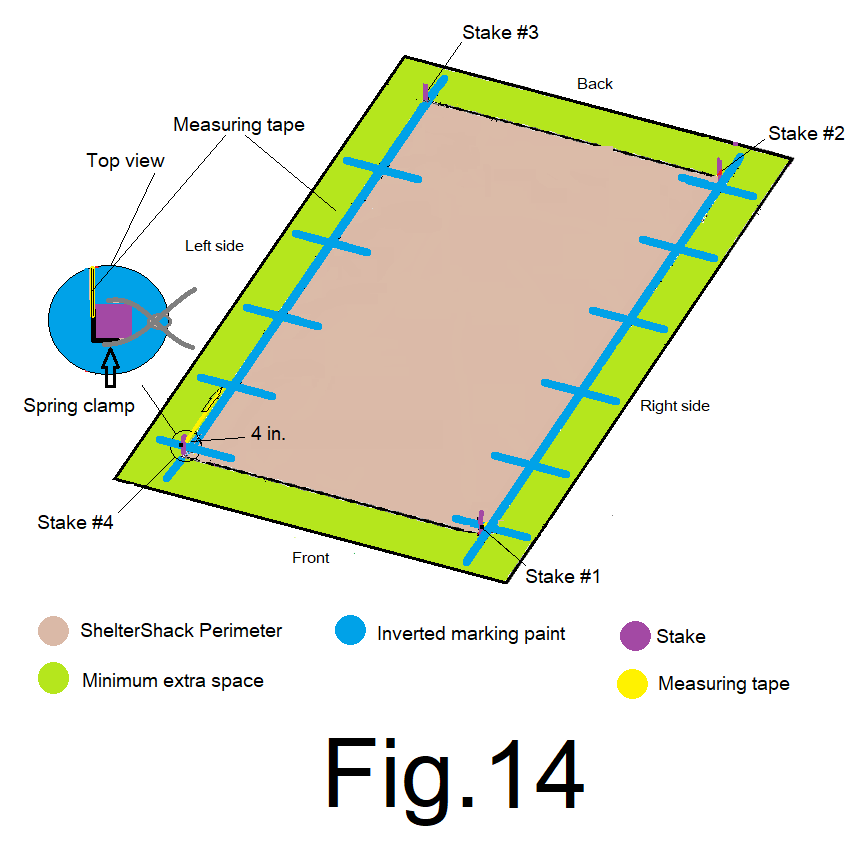
15) Measure from the front left corner of the front left corner stake #4 toward the back along the left sidewall and mark a 3 ft. long cross line at 4 inches. Fig 14
16) Measure from the outside corner of the back left corner stake #3 toward the front along the left sidewall and mark a 3 ft. long cross line at 4 inches. Fig 15
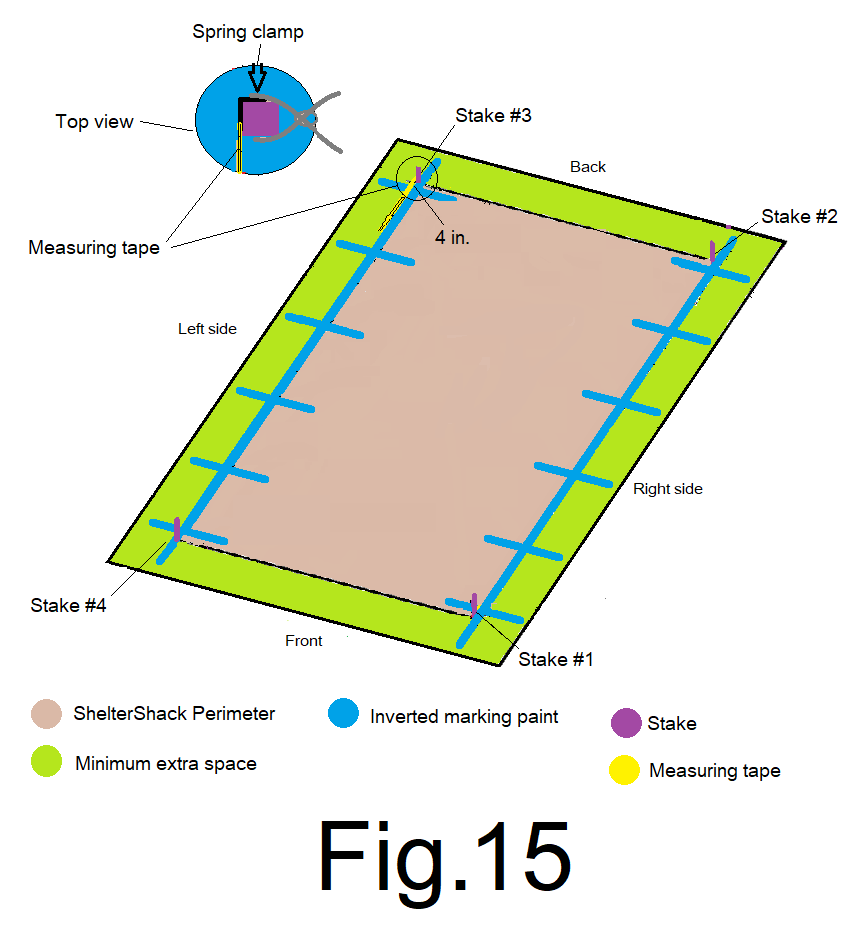
Your JDPShack’s metal “T” post hole locations have now been established. Remove the stakes.
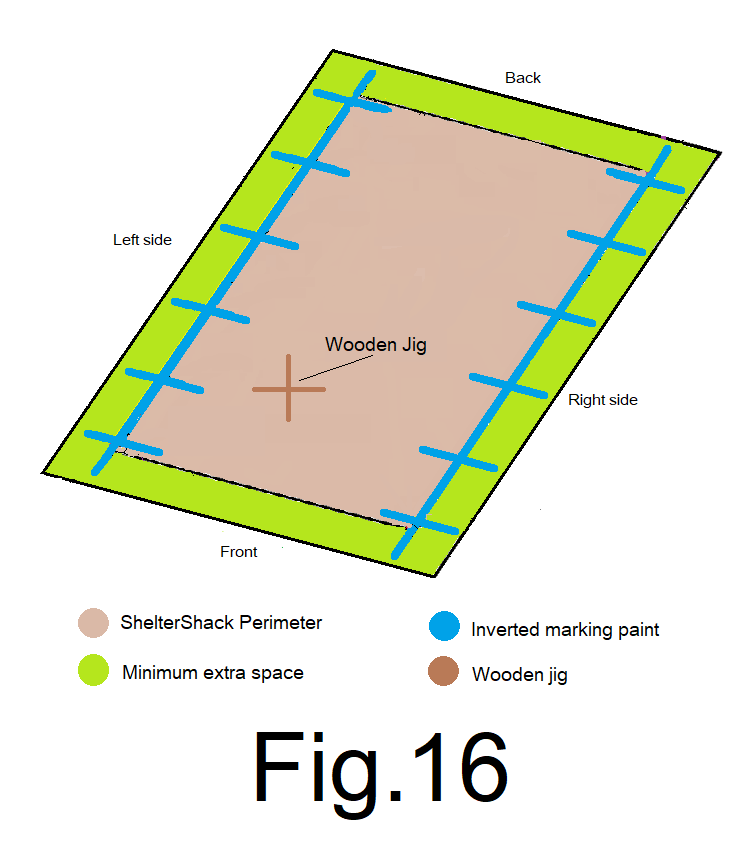
17) Make a cross shaped “jig” out of (2) 30 in. long 1in. x 2in. strips, (or any strip wood, like old interior trim), simply screwed together at the center of each. Fig 16
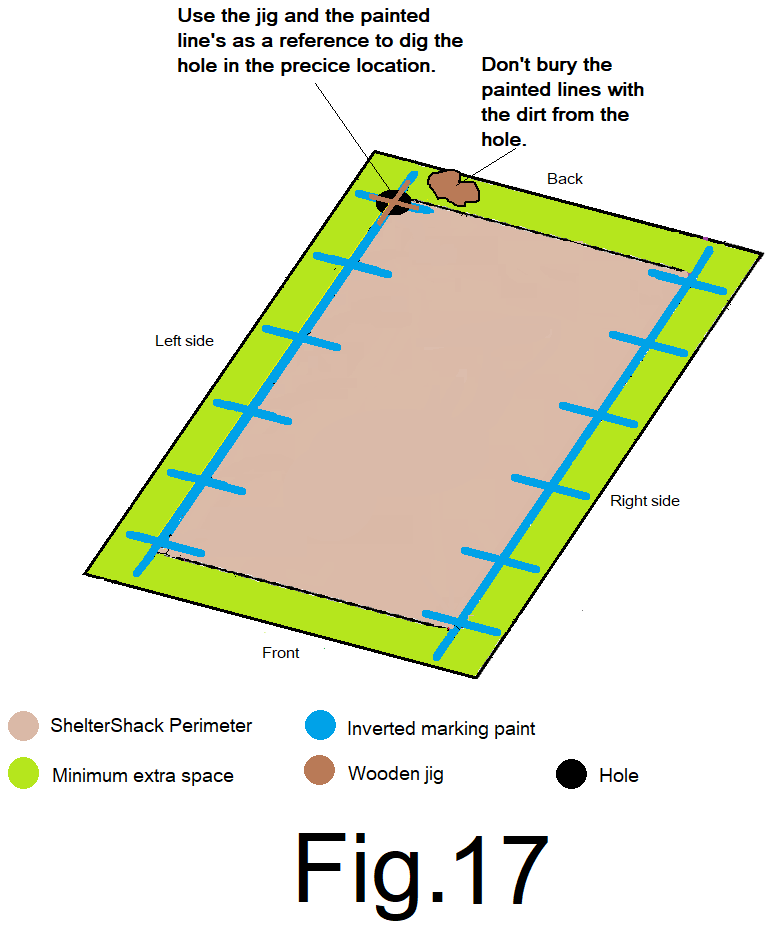
18) Use the cross shaped jig overtop of the crosses painted on the ground as you dig the holes in order to visually keep your holes centered as you dig. Dig a little and then check and then dig more and then check and so on…. Fig 17
19) Dig 2 ft. deep holes, 1 ft. wide at the top and tapered to about 4 to 6 in. at the bottom, at each of the (12) metal “T” post locations, making sure to continuously observe the painted lines and dig the holes centered where the paint lines intersect. Use the “cross jig” as a guide, and try to not cover your paint lines with dirt. Fig 18
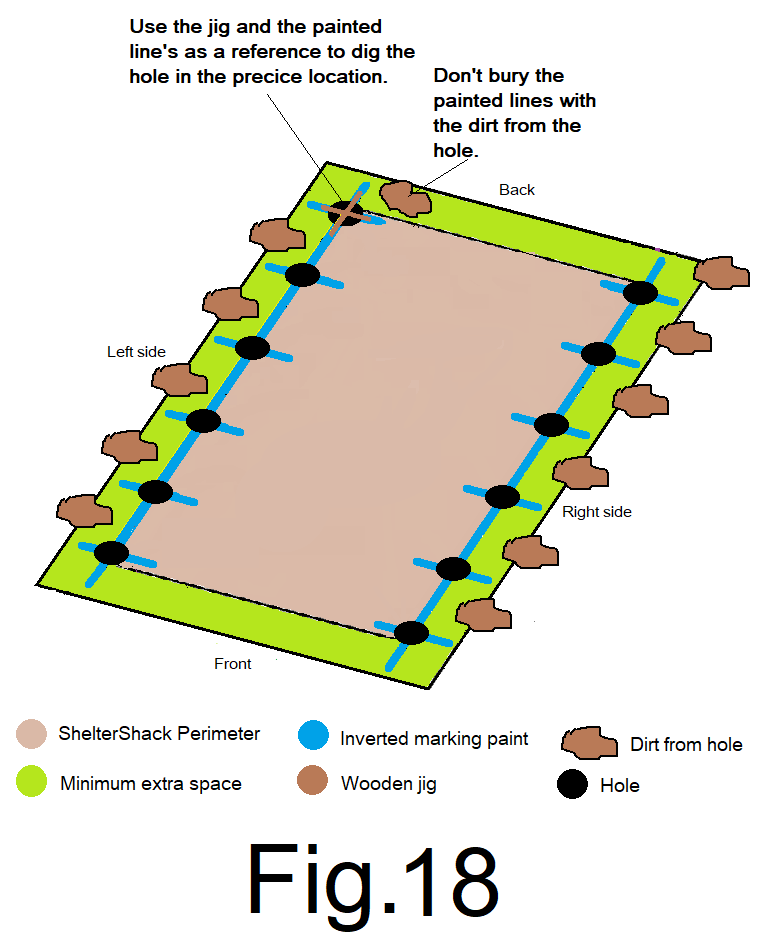
You may need an Iron digging bar, and/or a jackhammer, to make digging the holes possible or easier.
OK; holes dug, good job! Move the dirt back, out of the way.
Now you are ready to set up batter boards and mason string, which will be used as a reference to set your metal “T” posts in concrete at their precise locations.
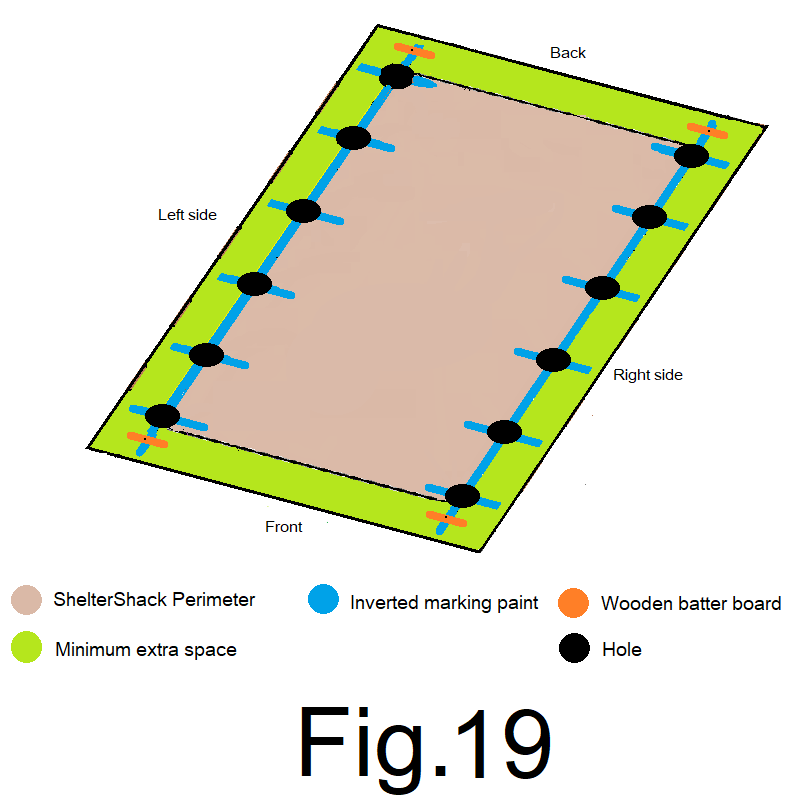
20) Place 4) 24 in. pieces of 2×4 (framing wood),”batter board”, on the ground, approximately 2 ft. 6in. beyond the end of each of the four corner holes, perpendicular to the side wall line and approximately centered. Mark the center of the top side edge of each 2×4 and use the mark as a visual reference to assist in placing the batter boards centered and placed standing up on their edge Fig. 19
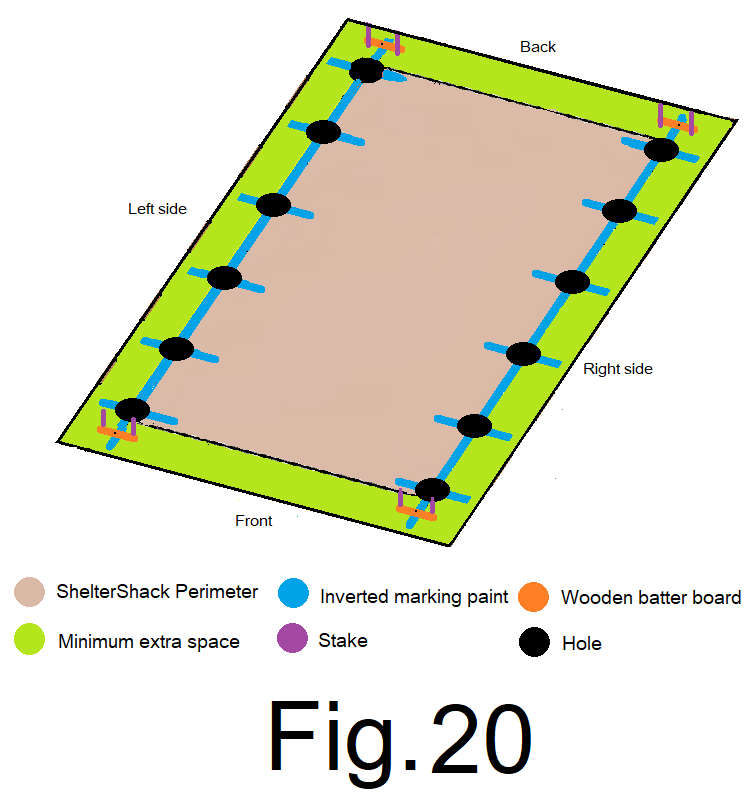
21) Set 2 stakes securely and plum into the ground along the inside of each 2×4 batter board, between the batter board and the corner hole and approximately 4 inches in from the outside end of the batter board, at both ends of the batter board. At all 4 corners. Fig 20
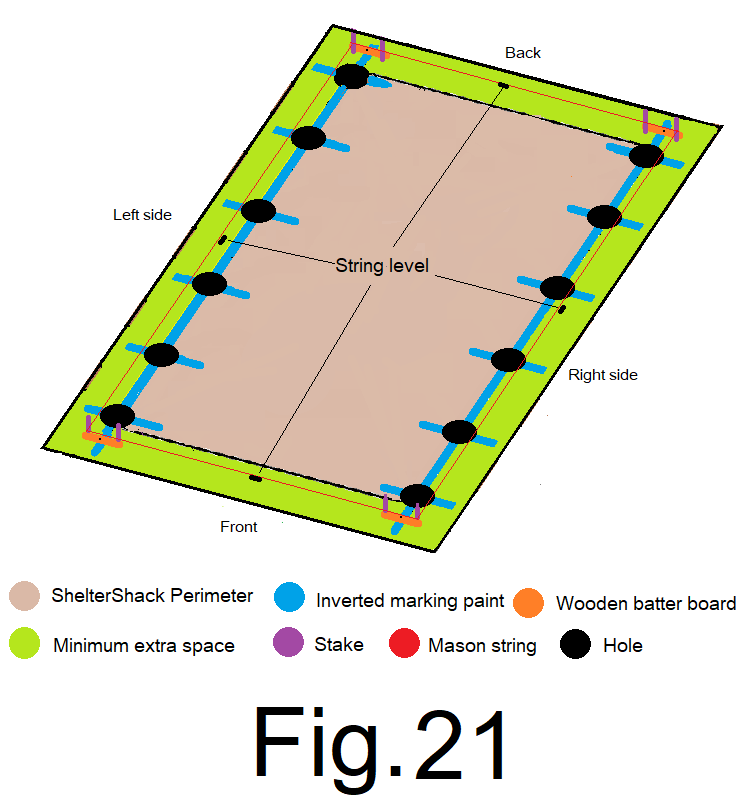
22) If your building sight is relatively level, skip this step, 22). If not so level, determine the lowest corner of the building sight location using a “sight level”. Or, attach a mason string to the outside stake at the front right corner, 4 in. up from the ground, extend the string along the right sidewall and attach it to outside stake at the back right corner, 4 in. up from the ground and tension the string. Then, attach a mason string to the outside stake at the back right corner, 4 in. up from the ground, extend the string along the back end wall and attach it to outside stake at the back left corner, 4 in. up from the ground and tension the string. Then, attach a mason string to the outside stake at the back left corner, 4 in. up from the ground, extend the string along the left side wall and attach it to outside stake at the front left corner, 4 in. up from the ground and tension the string. Then, attach a mason string to the outside stake at the front left corner, 4 in. up from the ground, extend the string along the front end wall and attach it to outside stake at the right front corner, 4 in. up from the ground and tension the string. THEN, attach a “string level” to each of the 4 strings and determine which corner is lowest. Fig 21
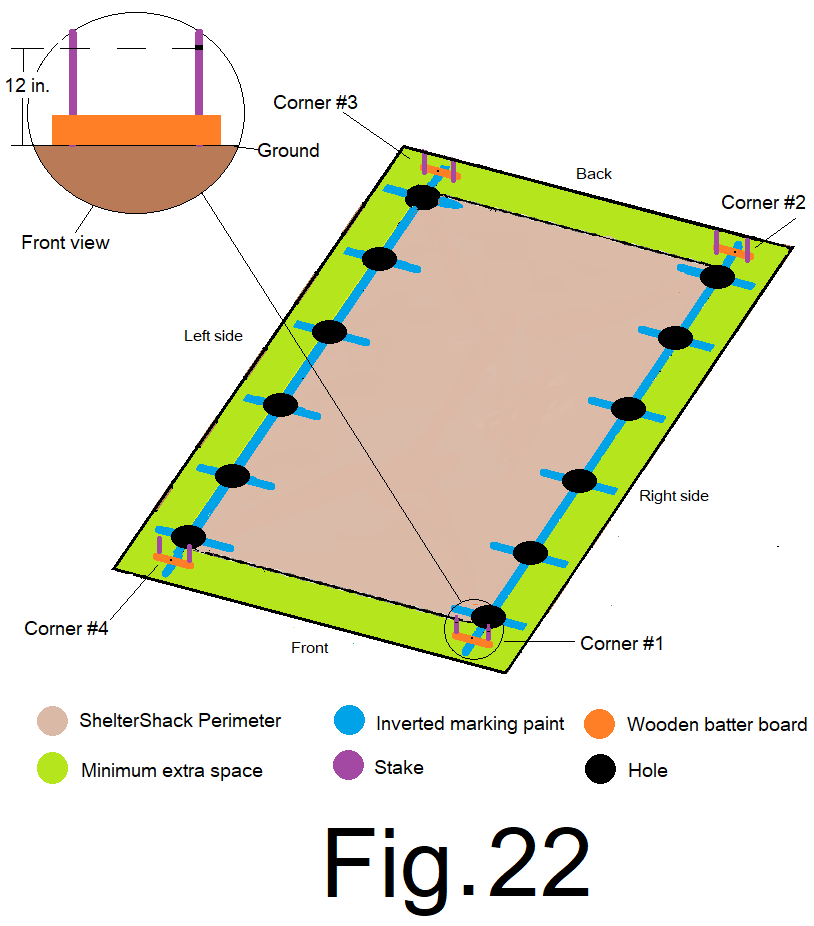
23) At the lowest corner, measure 12” up from the ground along the lowest stake if you can determine. Or the front right corner outside stake and mark the front of the stake, (away from building side of the stake). Fig 22
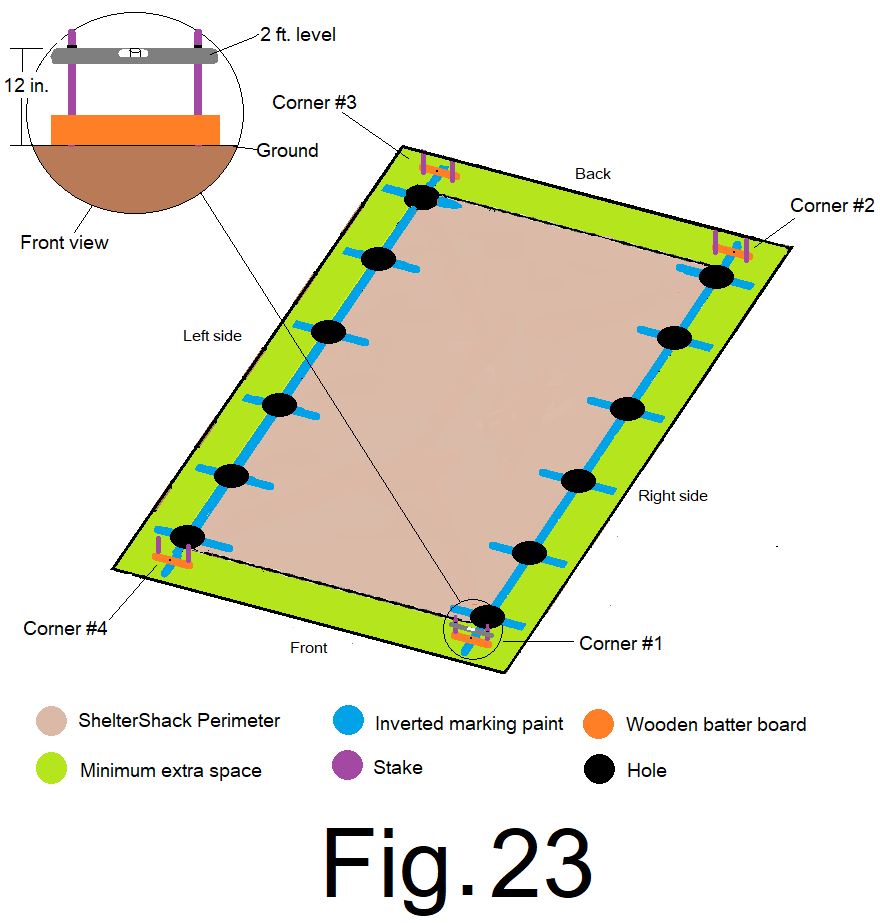
24) Using a 2 ft. level, make a mark, level, on the front of the other stake at that corner. Fig 23
25) Attach a mason string to the outside stake at the low corner, or the front right corner. Orient the string to the mark on the front of the stake. Extend the string along the front to the outside stake at the front left corner. Hold the string to the front of the outside stake and attach a small string level to the string. Pull and hold tension on the string and adjust it up or down on the stake to the point where the string level reads level and mark the front of the outside stake. And, mark the front of the inside stake at the same level height. Fig 24
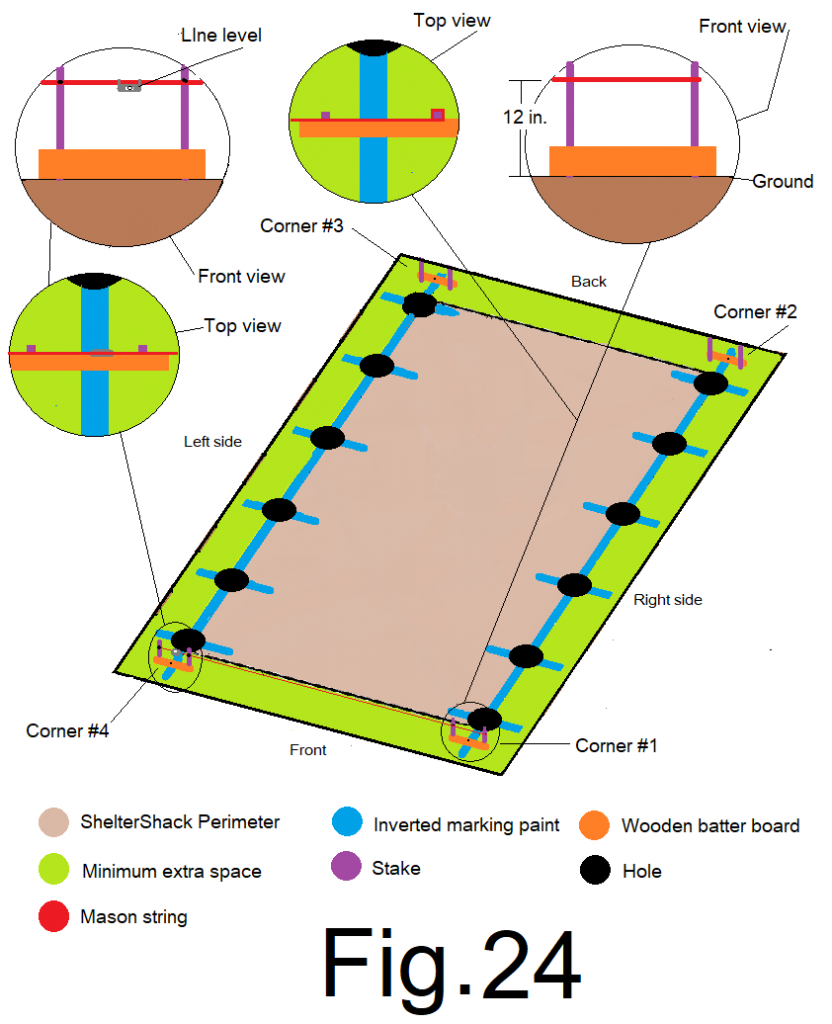
You have marked a level mark on the front of all four stakes at the front of your ShelterShack location.
26) Remove the string and reattach it to the same outside right corner stake at the same level mark, only, turn the string orientation around the other way and extend the string from the outside of the front right corner stake, along the side wall to the stake located on the outside of back right corner. Use the same technique as step 25) with the line level and mark the stake level. Fig 25
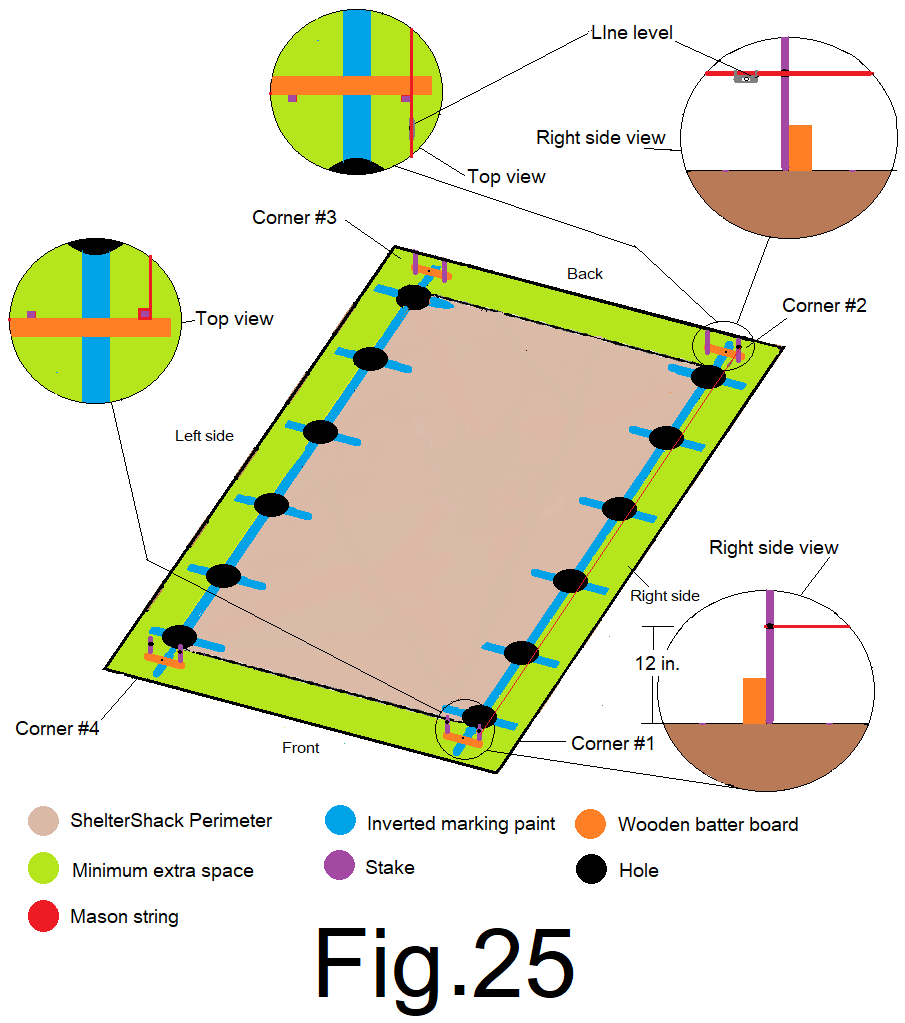
Adjust the mark height up or down, if desired, in order to slope your building from end to end, 1 in. up or down is plenty for gutter installation. (Gutter installation will be covered in the options section).
27) Extend the mark around the outside of the stake to the back of the stake, and with a 24” level, mark a level mark on the back of the inside stake. Fig 26
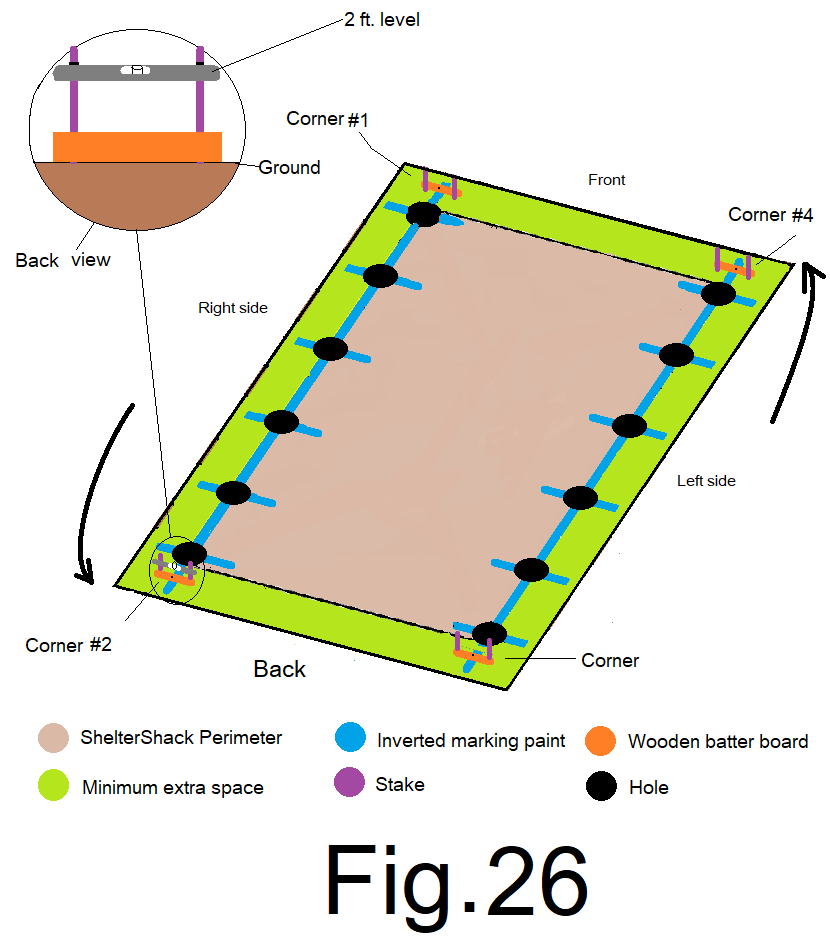
28) Attach a string to the outside stake at the back right corner. Orient the string to the mark on the back of the stake. Extend the string along the back end wall to the outside stake at the back left corner. Hold the string to the back of the outside stake and attach a small string level to the string. Tension the string and adjust it up or down on the stake to the point where the string level reads level and mark the back of the outside stake. And, mark the back of the inside stake at the same level height. Fig 27
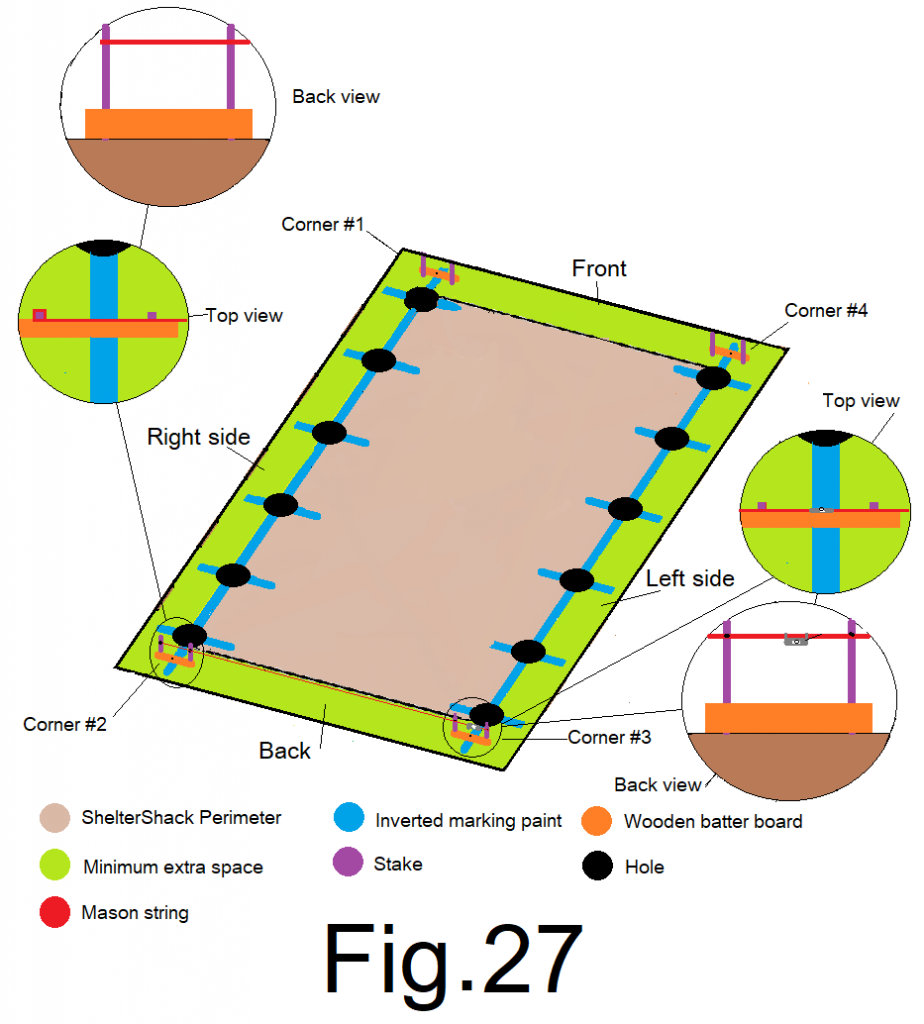
29) Use (2) “vice grip” style “C” clamps. Orient the top of the 2×4 to the level marks on the stakes evenly side to side, clamp the 2×4 to the outside (away from the building side) of the corresponding stakes. Using a screw gun, and 2″ roof screws, attach the 2×4 to the stakes. Repeat at the remaining corners. Fig 28
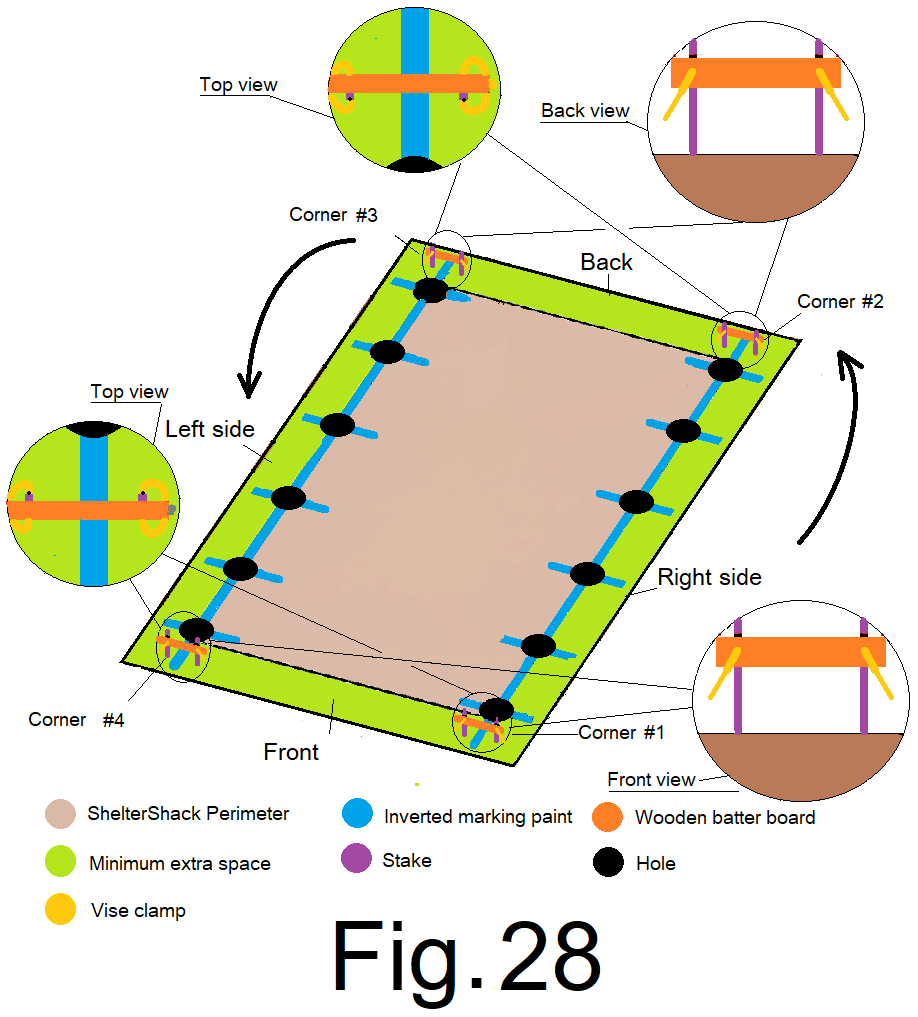
Now you have all four batter boards up and they need to be braced.
30) Set 2 stakes into the ground at an approximate 30o angle next to the batter board and attach the stakes to the top front corner of the batter board with 2 in. roofing screws, 1 stake at each end of the batter board. Repeat at the remaining corners. Fig 29
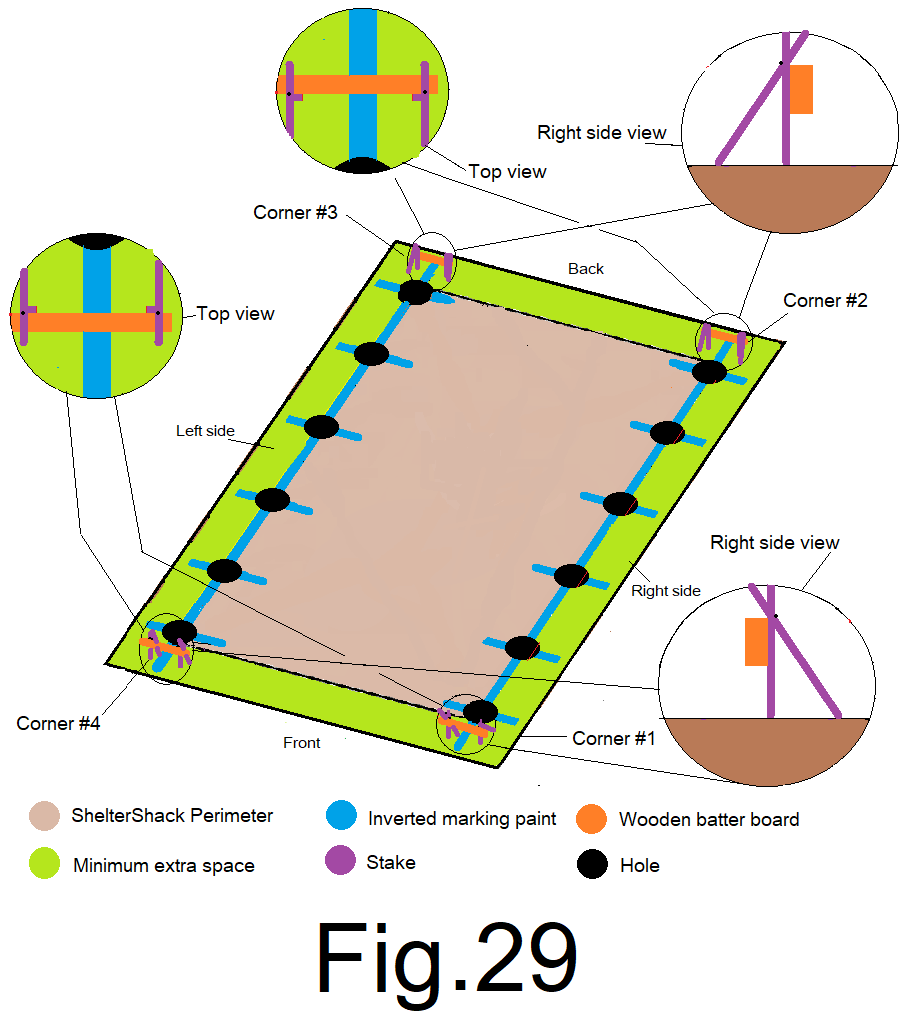
Batter boards up and braced… Good Job!
31) Lay a mason string from end to end along the right sidewall across the center of both front and back batter boards and 3 ft. beyond. Using the string as a reference, locate the center of the “T” post holes and adjust the mark on the batter boards if necessary. Fig 30
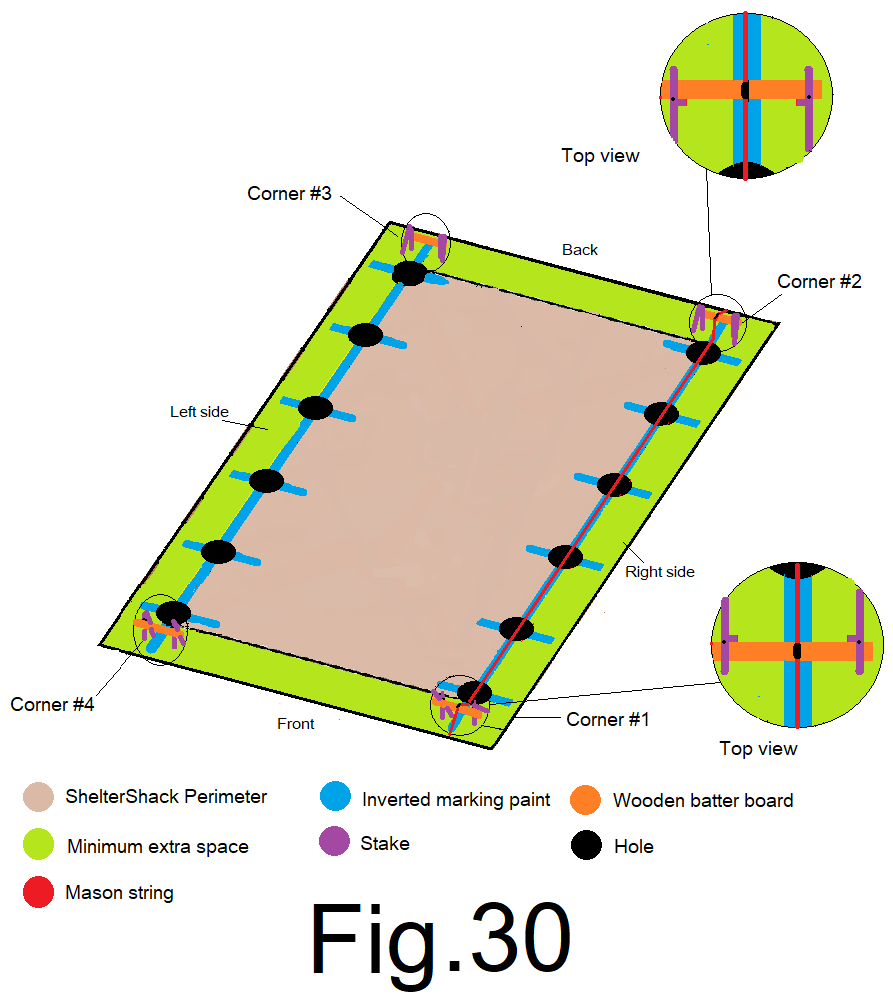
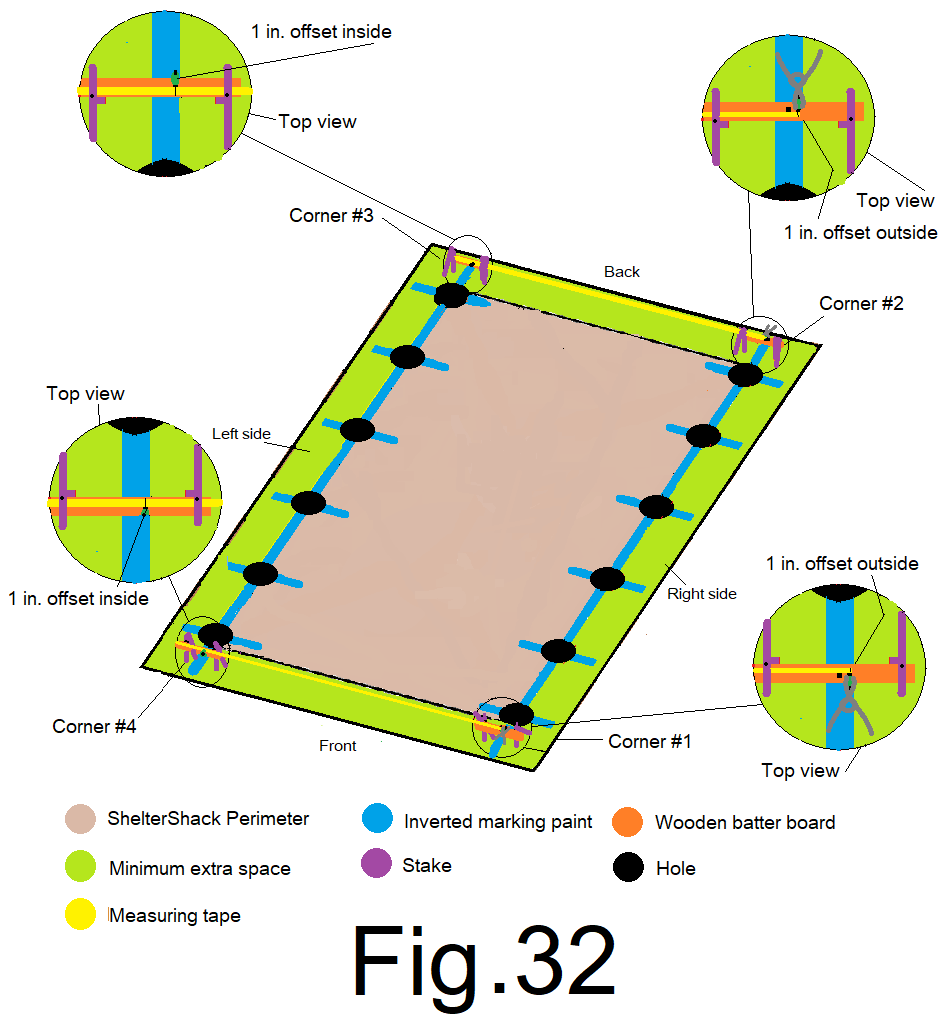
32) From the center mark on the top of each of the 2 batter boards along the right side, measure 1 inch toward the outside and make another mark on the top of each batter board. Then, set a 2 in. (8p) nail at a 20o angle about halfway down into the top of each batter board at the 1 in. offset mark. Fig 31
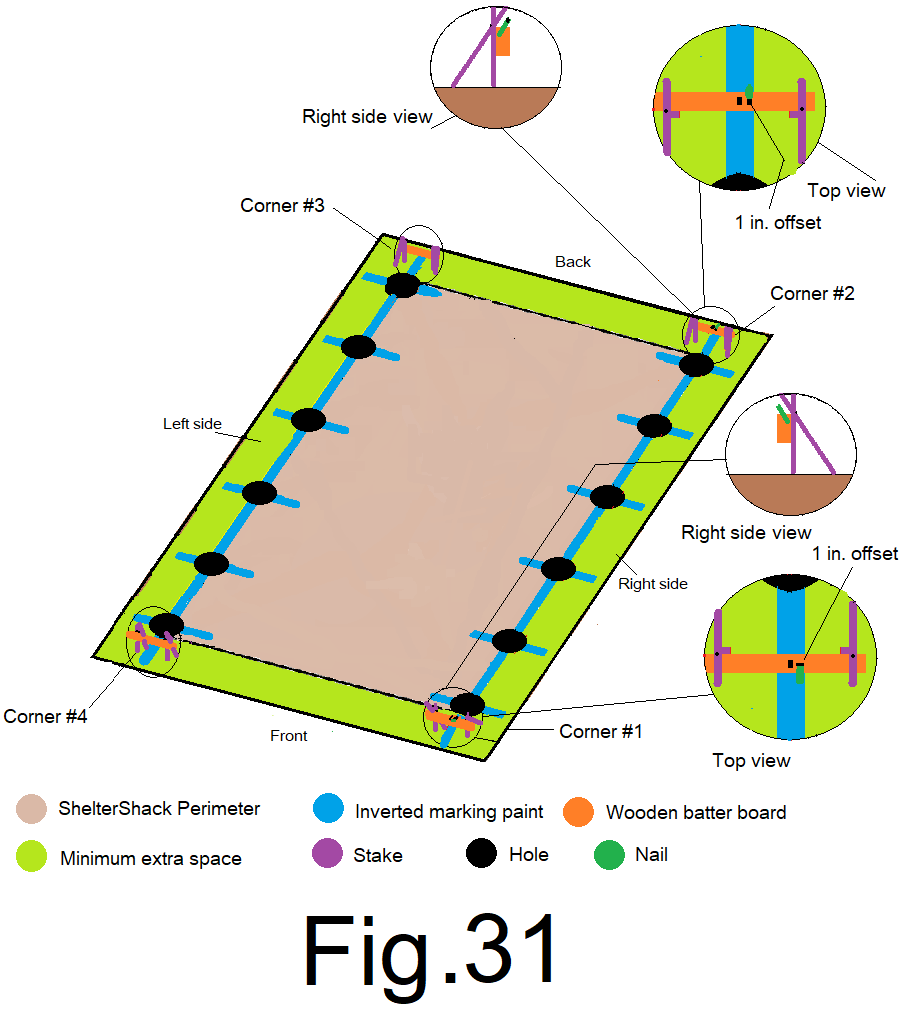
33) Spring clamp a measuring tape to the nail on the top of the batter board at the front right corner and extend it across the front end wall, over to the batter board at the front left corner, mark the top of that batter board at 14 ft. Remove the tape and clamp. Then, spring clamp a measuring tape to the nail on the top of the batter board at the back right corner and extend it across the back end wall, over to the batter board at the back left corner, mark the top of the batter board at 14 ft. Then set a 2 in. (8p) nail at a 20o angle, set halfway down into the top of each of the 2) left side batter board at the offset marks. Fig 32
34) Attach a mason string to the nail on the front right side batter board and extend it along the right side wall to the nail on the back right batter board, stretch it tight and secure it to the nail, keeping the string tight to the top of the batter boards on both ends. Repeat on the left side. Fig 33
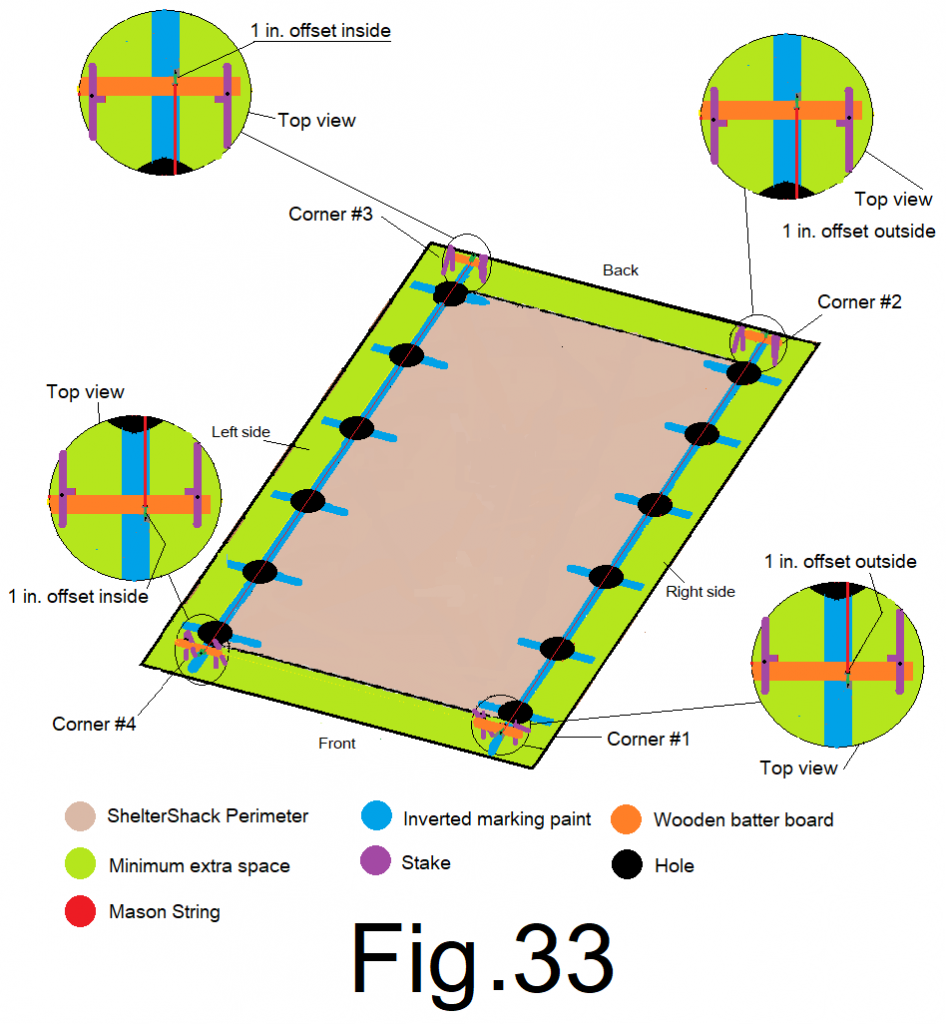
Offsetting the string by 1in., toward the outside on the right side will allow the “T”post to be set centered into the holes from the inside.
Offsetting the string by 1in., toward the inside on the left side will allow the “T”post to be set centered into the holes from the outside.
Now you are ready to ink mark the “T” post location layout on the mason strings with a “sharpie” ink pen.
Always reference the center of the mark. That is, pull tape, make mark, check mark, adjust mark by adding until the center of the mark is the number. It doesn’t matter how big the mark is as long as the center is the point of reference. OK
35) Starting at the front right corner, using a “string plumb”, mark the string at the precise location of the center of the front right corner hole. Fig 34
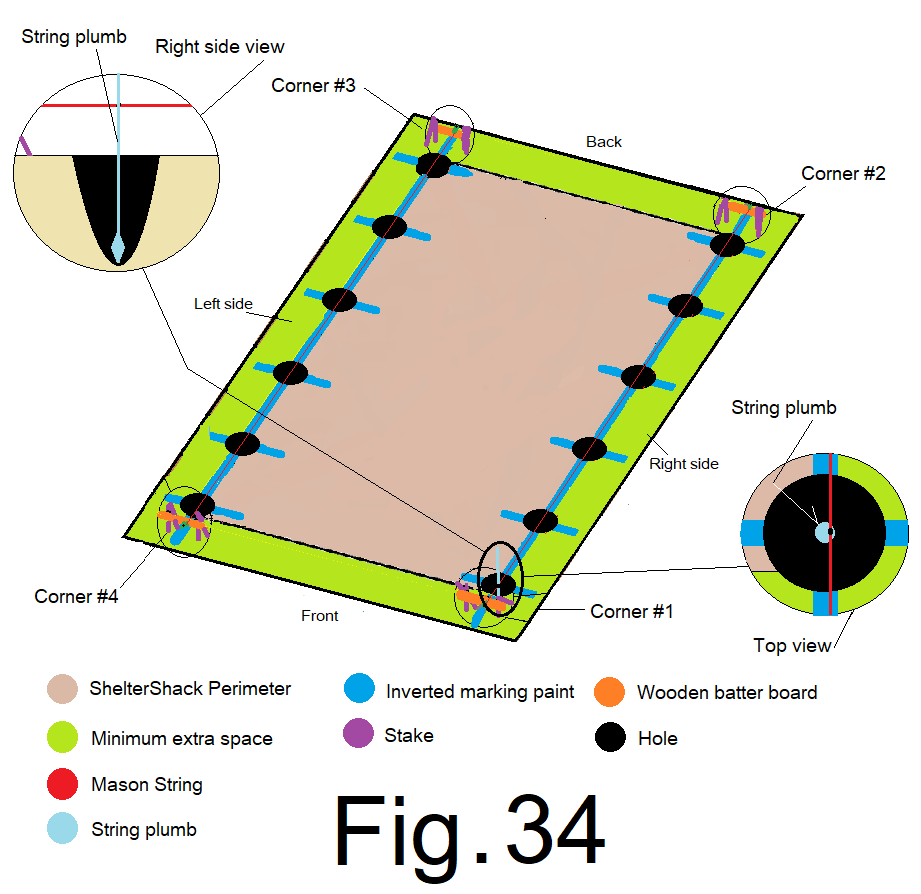
Notice again; The string should pass over the top of each hole and is offset by about 1 inch, the right side string will be offset to the outside of center and the left side string will be offset to the inside of center.
36) Attach a measuring tape to the front center of the front right side batter board. Extend the measuring tape, in line with the string to the mark at the center of the first hole. Note the number of the reading,
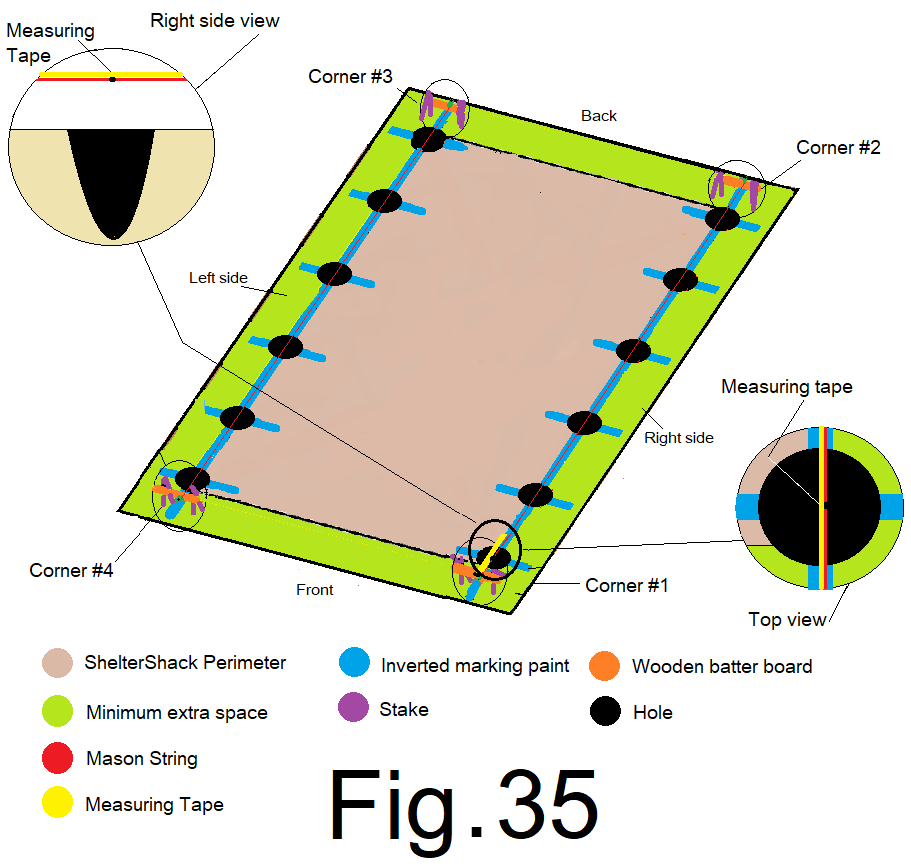
37) Subtract 4 in. from the reading from step 36) and make a new mark on the string 4 in. back toward the front batter board. Make a note of that new number, write it down, (FR=______). It should be 4 in. less than the number from step 36. Fig 36
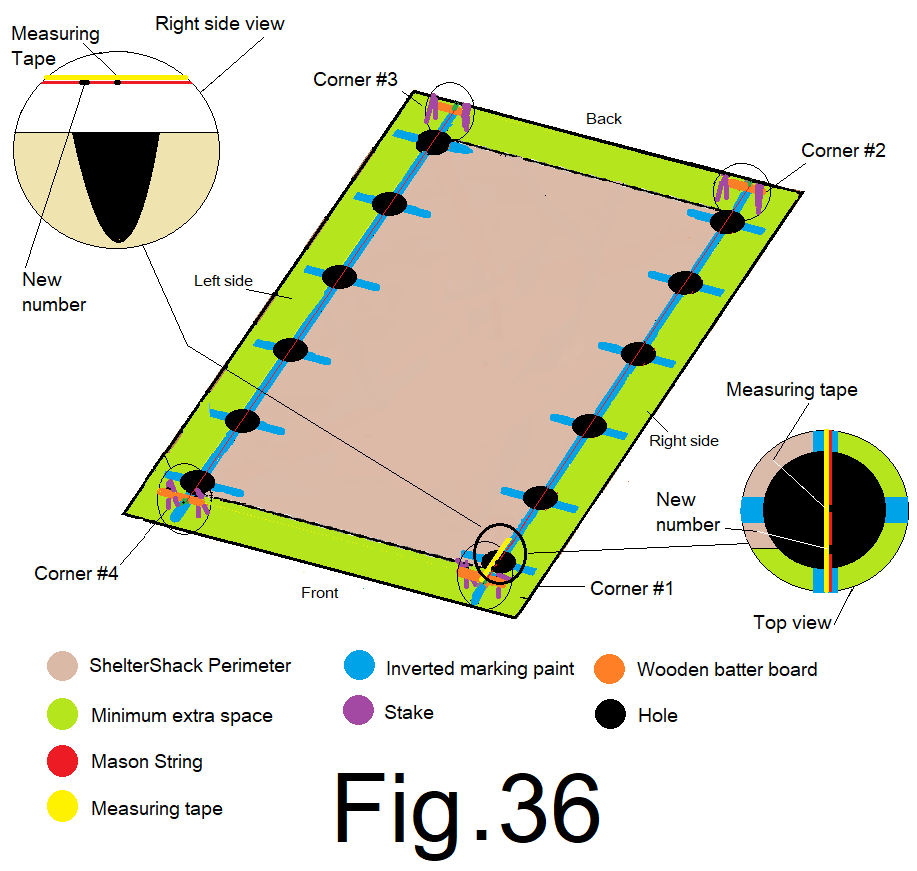
38) Continue extending the measuring tape, adding 48 in. or 4 ft. to the corner or new number mark. Mark the string. This mark should be directly over the 2nd hole. Fig 37
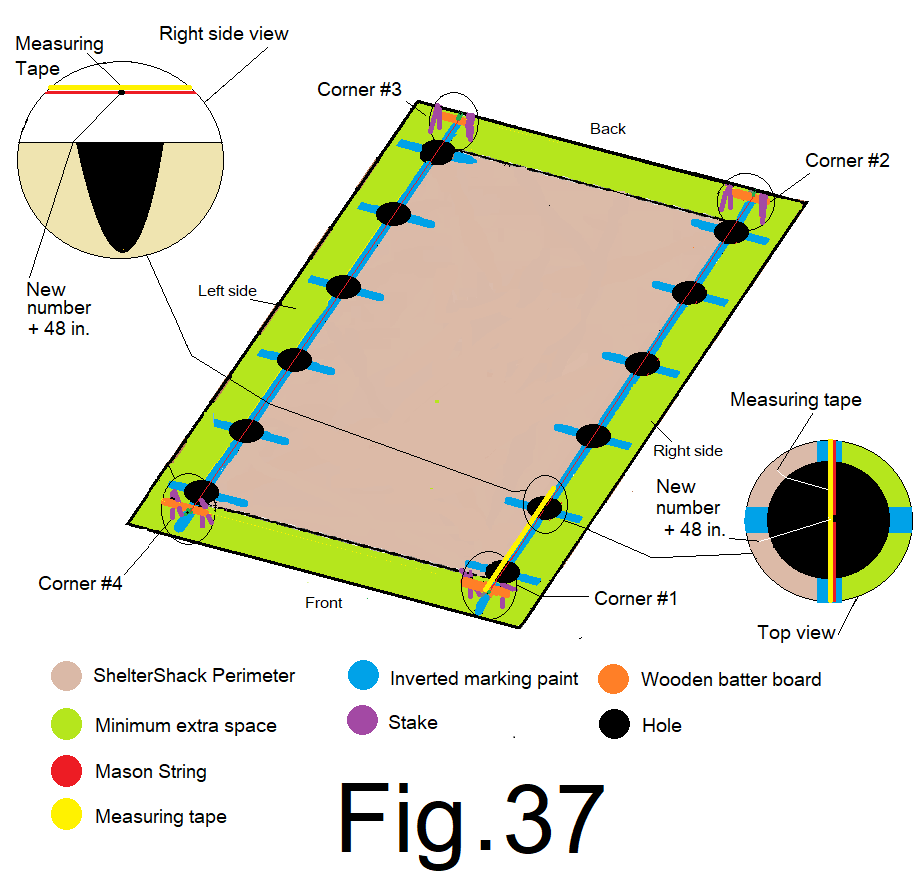
39) Continue extending the measuring tape, adding another 48 in. or 4 ft. to the new number and mark the string. This mark should be directly over the 3rd hole. Fig. 38
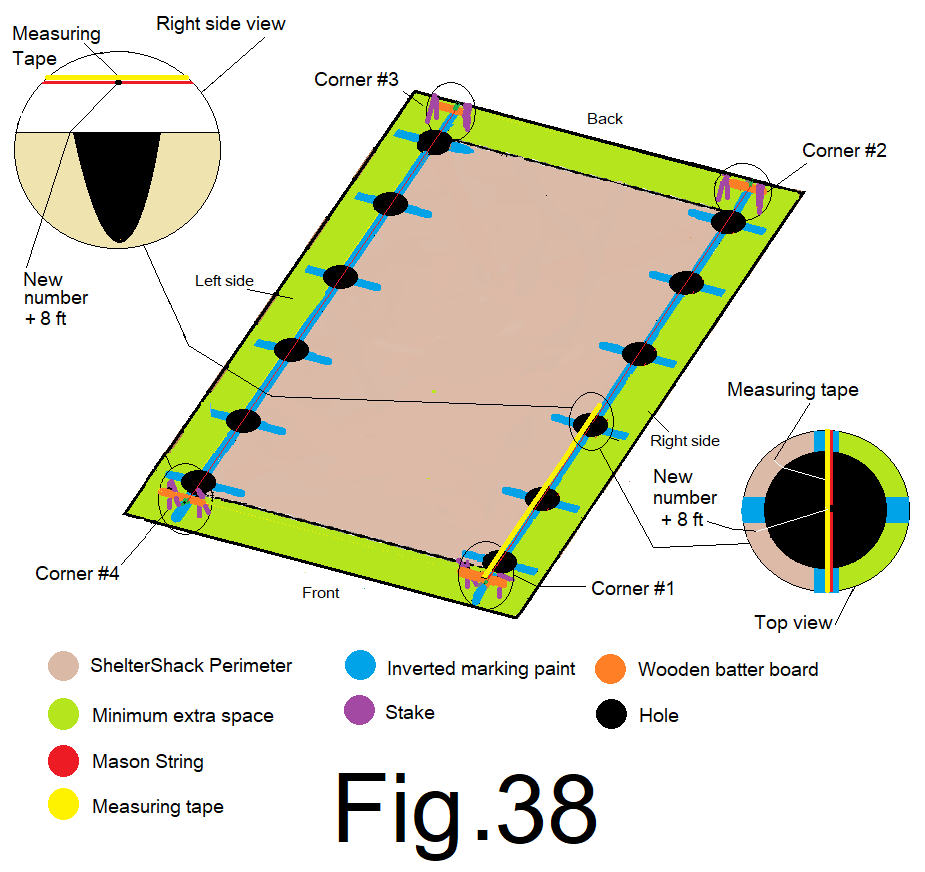
40) Continue extending the measuring tape, adding another 48 in. or 4 ft. to the new number and mark the string. This mark should be directly over the 4th hole. Fig 39
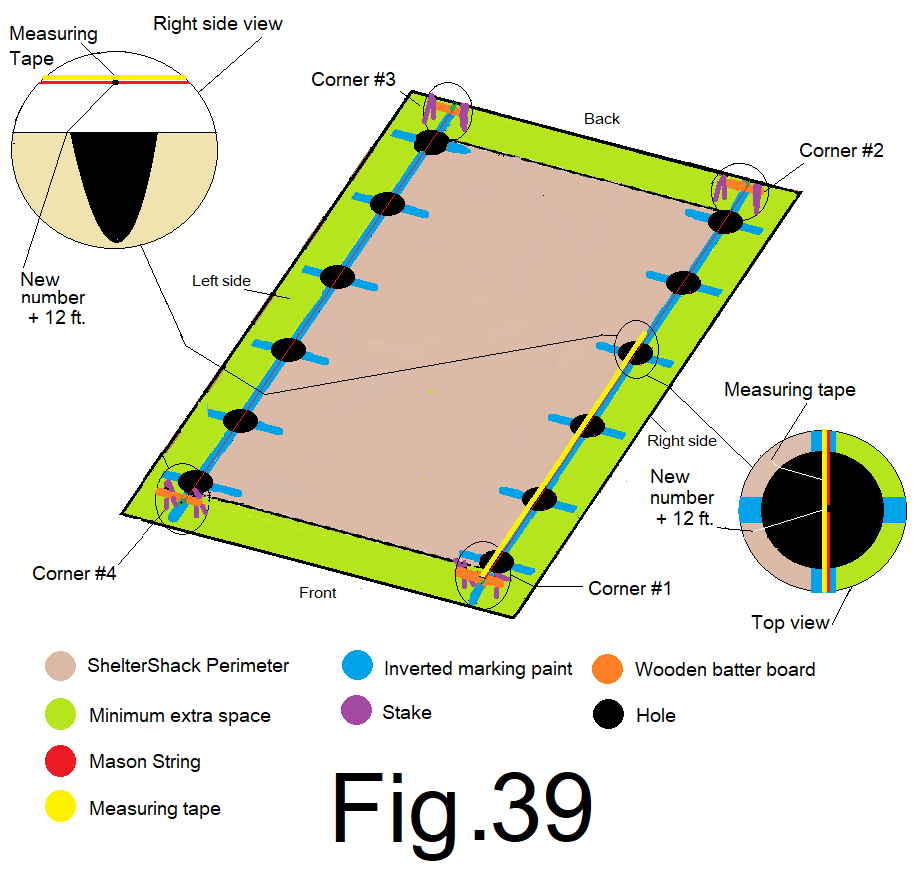
41) Continue extending the measuring tape, adding another 48 in. or 4 ft. to the new number and mark the string. This mark should be directly over the 5th hole. Fig. 40
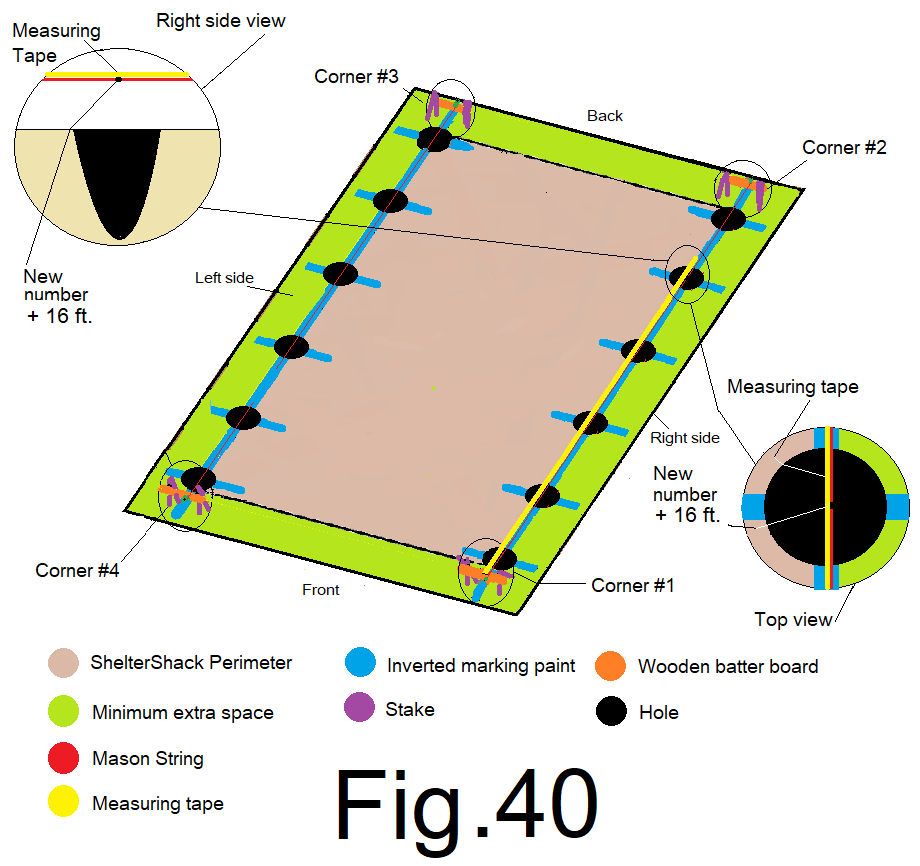
42) Continue extending the measuring tape, adding another 48 in. or 4 ft. to the new number and mark the string at that location. This last mark should be 4 in. beyond the center of the corner hole. Subtract 4 in. from that reading and mark the string. Fig 41
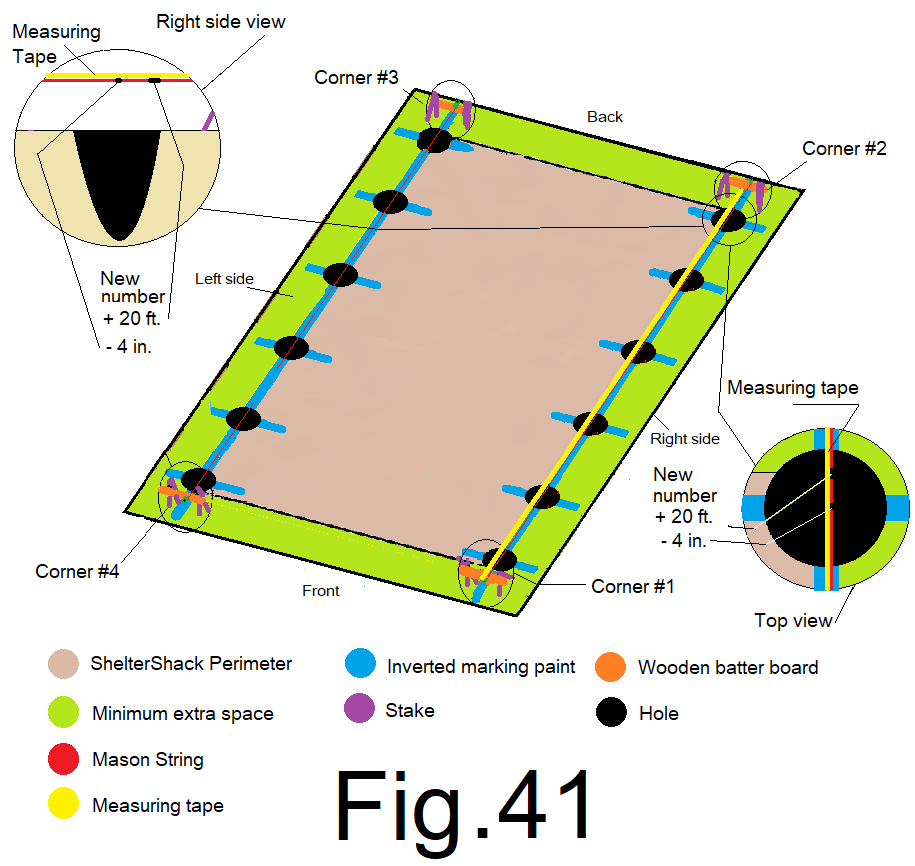
Notice: Both corners on this sidewall have 2 marks, 4 inches apart. The outside mark is the corner of JDPShack, and the inside mark should be located directly over the corner hole.
You will need a helper for this next step.
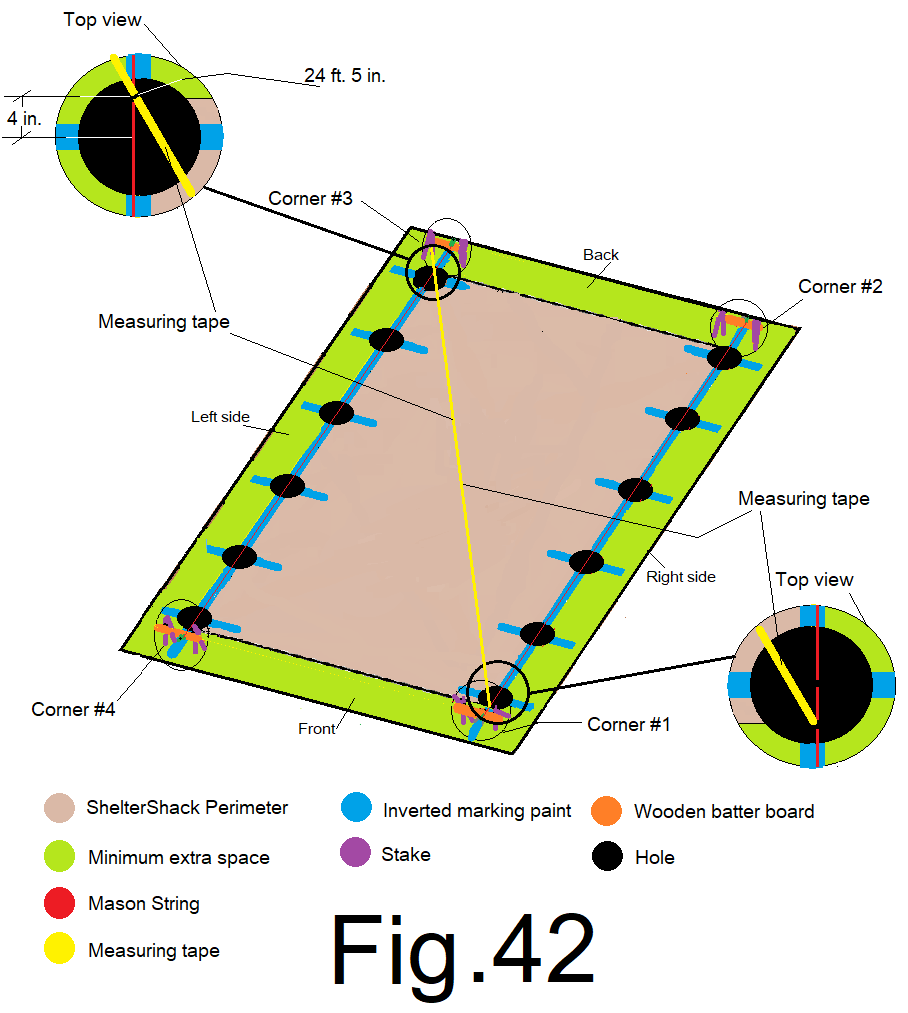
43) Have your assistant hold one end of a measuring tape directly to the point in the middle of the mark on the string at front right corner #1, (without moving the string), it should be a corner mark, four inches outside the center of the corner hole. Extend the measuring tape diagonally 24 ft. 5 in. (diagonal square) and make a mark on the opposite string at the back left corner #3. Fig 42
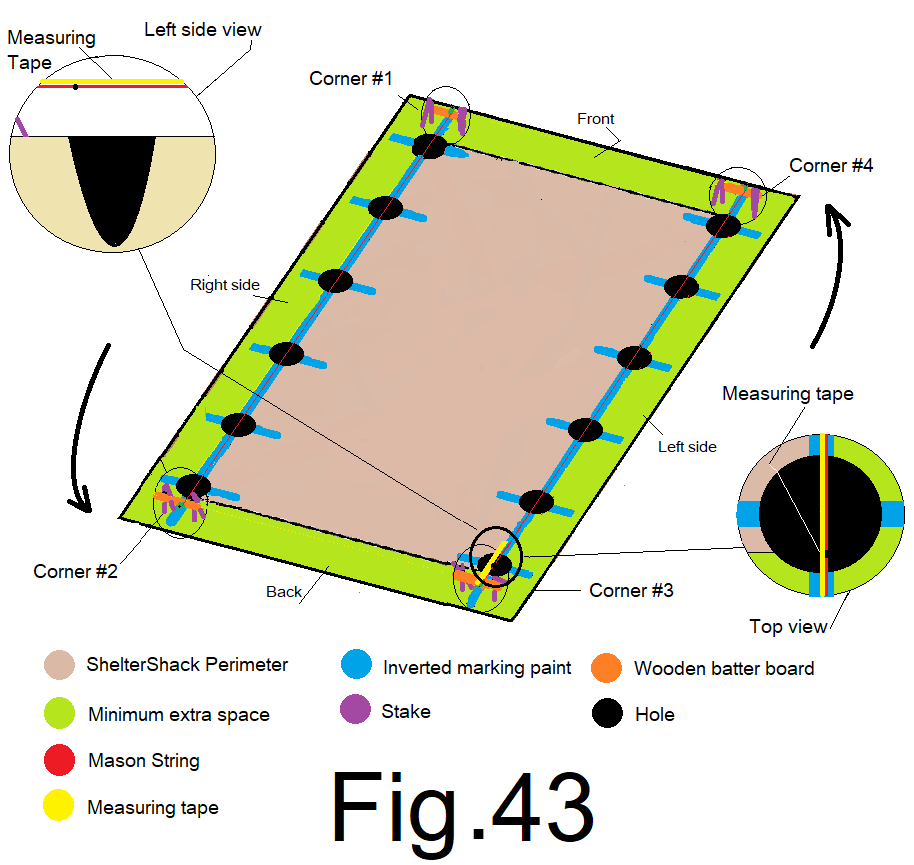
44) At the back left corner, attach a measuring tape to the back of the center of the batter board. Extend the measuring tape, in line with the string to the back left corner mark on the string and make a note of that reading, (write it down somewhere BL=___). Fig. 43
45) Extend the measuring tape another 4 in. from the corner reading and mark the string. This mark should be directly over the 1st hole. Fig 44
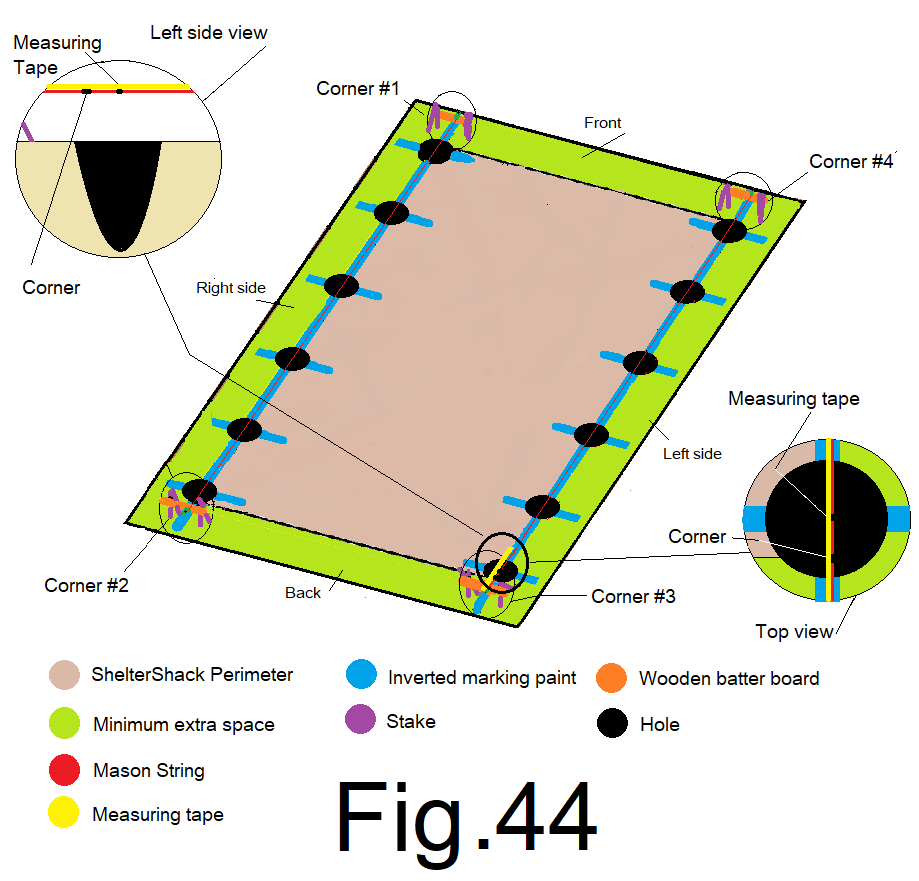
46) Continue extending the measuring tape another 48 in. or 4 ft. from the corner number and mark the string. This mark should be directly over the 2nd hole. Fig 45
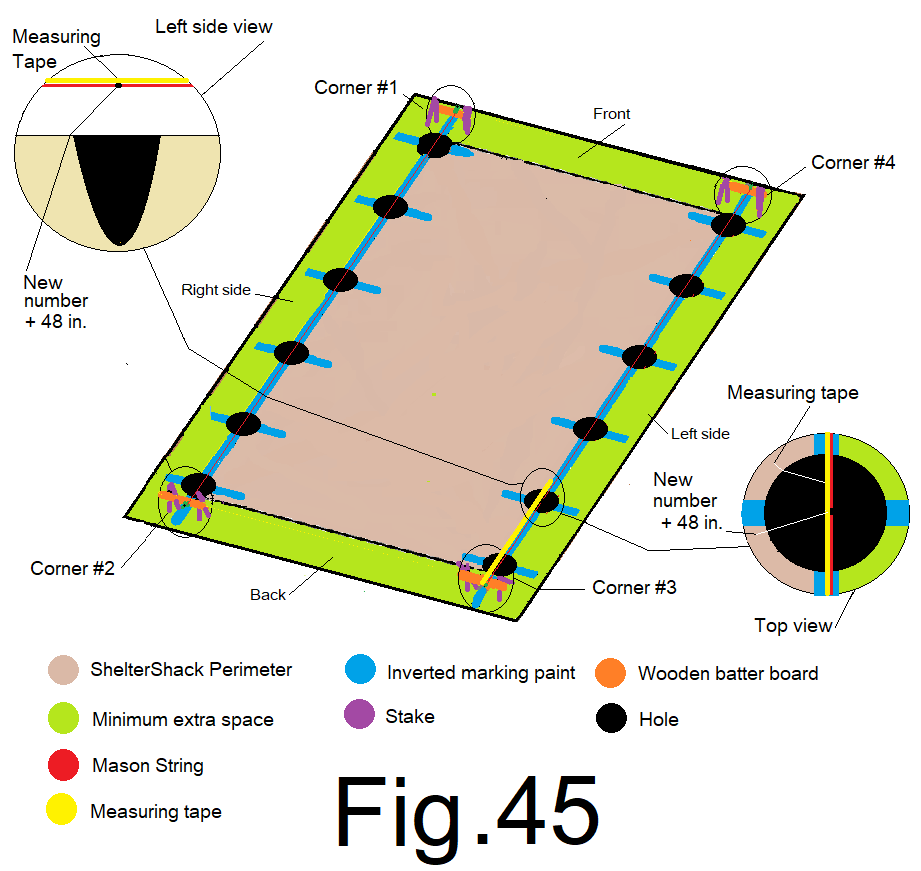
47) Continue extending the measuring tape, adding another 48 in. or 4 ft. and mark the string. This mark should be directly over the 3rd hole. Fig. 46
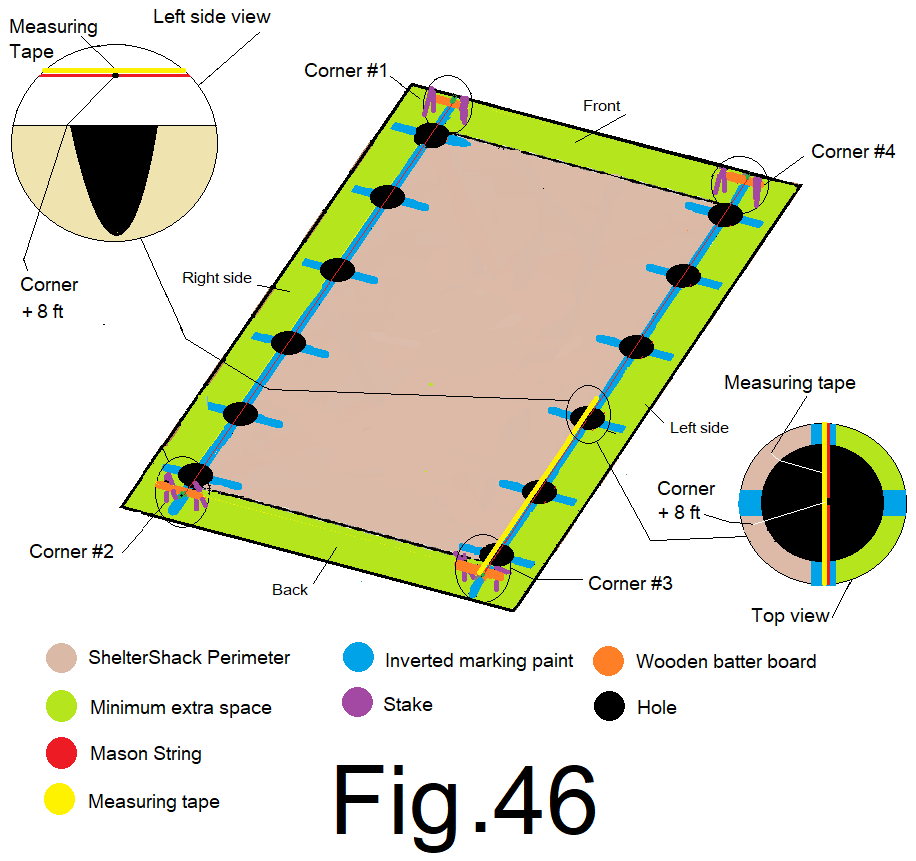
48) Continue extending the measuring tape, adding another 48 in. or 4 ft. and mark the string. This mark should be directly over the 4th hole. Fig 47
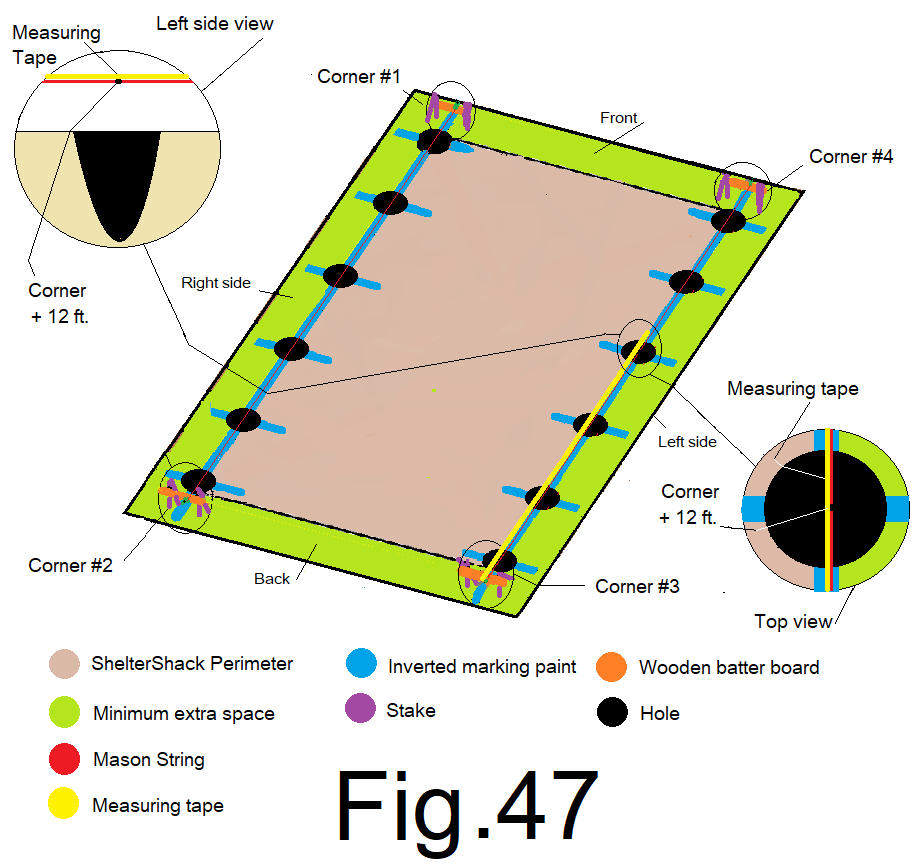
49) Continue extending the measuring tape, adding another 48 in. or 4 ft. and mark the string. This mark should be directly over the fifth hole. Fig 48
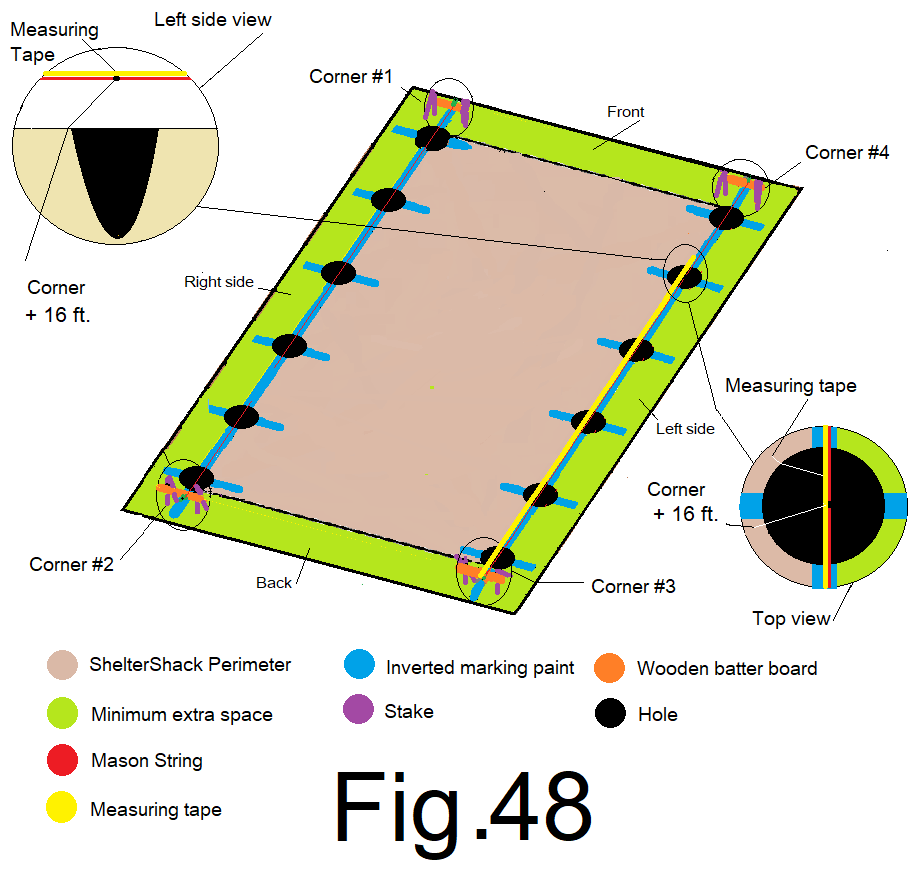
50) Continue extending the measuring tape, adding another 48 in. or 4 ft. and mark the string. This mark should be 4 in. beyond the center of the last hole. Subtract 4 in. from that reading and mark the string. This mark should be directly over the corner hole. Fig 49
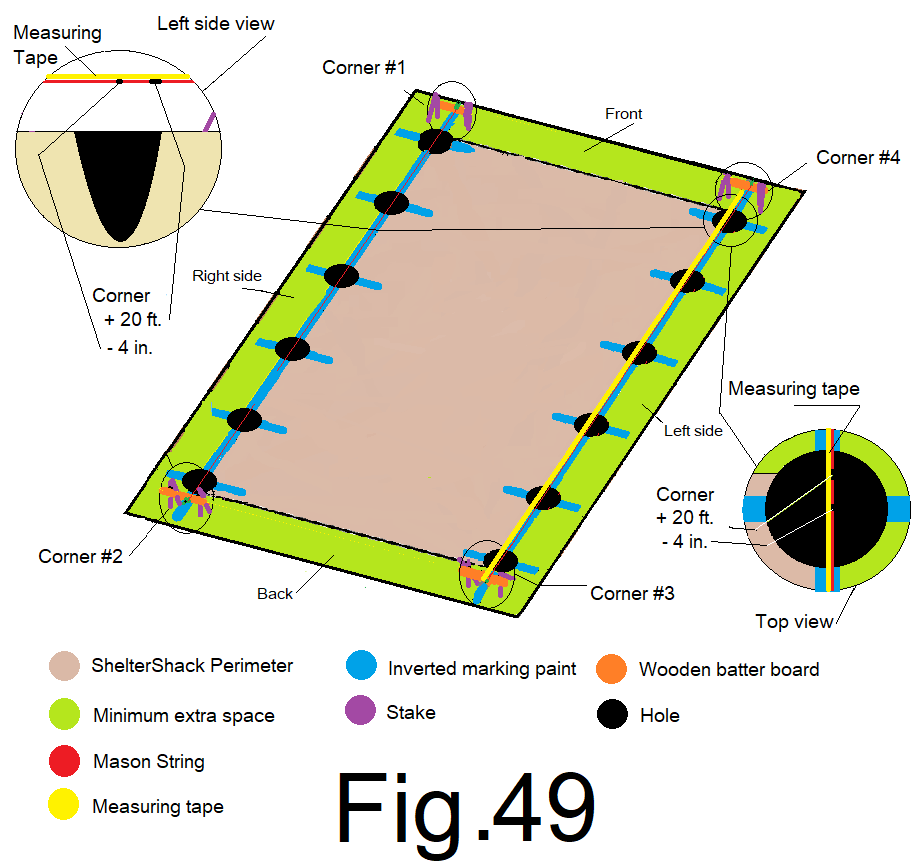
Notice: Both corners on this sidewall have 2 marks, 4 inches apart. The outside mark is the corner of JDPShack, and the inside marks should be located directly over the corner holes.
Save the measuring tape readings from steps 37)FR or front right =______ and 44)BL or back left =______. If one of the reference strings gets severed by accident. You can set a new string, tightly, and then repeat steps 37) through 42) or 45) through 50) depending on which string breaks. Setting the “T” posts into the ground correctly is absolutely critical. The batter board, strings, marks on the string, marks on the “T” posts and a post level will all be used as a guide…..
© 2021